
Page 180 - Engineering drawing from first principles using AutoCAD
P. 180
Fasteninqs 173
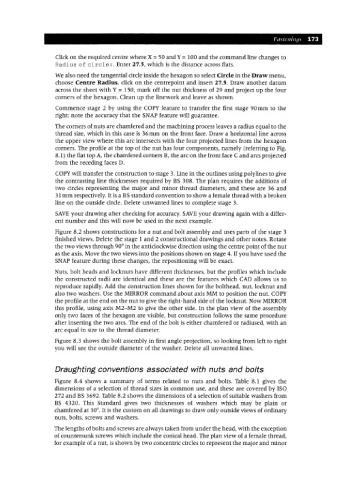
Click on the required centre where X =SO and Y=100 and the command line changes to
Radius of circle:. Enter 27.5, which is the distance across flats.
We also need the tangential circle inside the hexagon so select Circle in the Draw menu,
choose Centre Radius, click on the centrepoint and insert 27.5. Draw another datum
across the sheet with Y = 1SO, mark off the nut thickness of 29 and project up the four
corners of the hexagon. Clean up the linework and leave as shown.
Commence stage 2 by using the COpy feature to transfer the first stage 90mm to the
right; note the accuracy that the SNAPfeature will guarantee.
The corners of nuts are chamfered and the machining process leaves a radius equal to the
thread size, which in this case is 36mm on the front face. Draw a horizontal line across
the upper view where this arc intersects with the four projected lines from the hexagon
corners. The profile at the top of the nut has four components, namely (referring to Fig.
8.1) the flat top A, the chamfered corners B, the arc on the front face C and arcs projected
from the receding faces D.
COpy will transfer the construction to stage 3. Line in the outlines using polylines to give
the contrasting line thicknesses required by BS 308. The plan requires the additions of
two circles representing the major and minor thread diameters, and these are 36 and
31mm respectively. It is a BS standard convention to show a female thread with a broken
line on the outside circle. Delete unwanted lines to complete stage 3.
SAVE your drawing after checking for accuracy. SAVE your drawing again with a differ-
ent number and this will now be used in the next example.
Figure 8.2 shows constructions for a nut and bolt assembly and uses parts of the stage 3
finished views. Delete the stage 1 and 2 constructional drawings and other notes. Rotate
the two views through 90° in the anticlockwise direction using the centre point of the nut
as the axis. Move the two views into the ·positions shown on stage 4. If you have used the
SNAPfeature during these changes, the repositioning will be exact.
Nuts, bolt heads and locknuts have different thicknesses, but the profiles which include
the constructed radii are identical and these are the features which CAD allows us to
reproduce rapidly. Add the construction lines shown for the bolthead, nut, locknut and
also two washers. Use the MIRROR command about axis MM to position the nut. COpy
the profile at the end on the nut to give the right-hand side of the locknut. Now MIRROR
this profile, using axis M2-M2 to give the other side. In the plan view of the assembly
only two faces of the hexagon are visible, but construction follows the same procedure
after inserting the two arcs. The end of the bolt is either chamfered or radiused, with an
arc equal in size to the thread diameter.
Figure 8.3 shows the bolt assembly in first angle projection, so looking from left to right
you will see the outside diameter of the washer. Delete all unwanted lines.
Dreughting conventions associated with nuts and bolts
Figure 8.4 shows a summary of terms related to nuts and bolts. Table 8.1 gives the
dimensions of a selection of thread sizes in common use, and these are covered by ISO
272 and BS 3692. Table 8.2 shows the dimensions of a selection of suitable washers from
BS 4320. This Standard gives two thicknesses of washers which may be plain or
chamfered at 30°. It isthe custom on all drawings to draw only outside views of ordinary
nuts, bolts, screws and washers.
The lengths of bolts and screws are always taken from under the head, with the exception
of countersunk screws which include the conical head. The plan view of a female thread,
for example of a nut, is shown by two concentric circles to represent the major and minor