
Page 243 - Hacking Roomba
P. 243
224 Part III — More Complex Interfacing
Unlike the SitePlayer, which uses the cross-platform ZeroConf/Bonjour/Rendezvous protocol
to help you auto-discover it, the XPort assumes you will use their Windows-based DeviceInstaller.
If you use Windows, go ahead and use that. If you don’t have Windows, you can still configure
the XPort using the networking debugging techniques mentioned in the “Debugging Network
Devices” sidebar earlier in this chapter.
The XPort will ask your network’s DHCP server for an IP address so that you can connect to
it. One method of finding its IP address is to do one nmap network scan before plugging the
XPort in and then another nmap network scan after plugging it in. The extra IP address that
appears is the XPort.
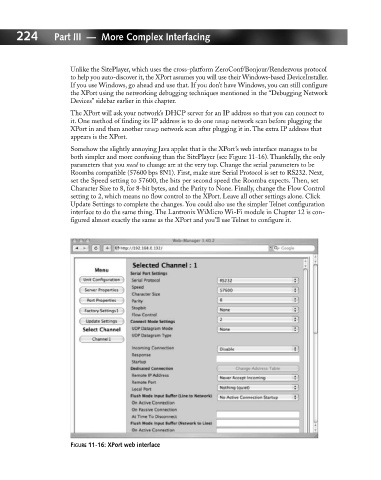
Somehow the slightly annoying Java applet that is the XPort’s web interface manages to be
both simpler and more confusing than the SitePlayer (see Figure 11-16). Thankfully, the only
parameters that you need to change are at the very top. Change the serial parameters to be
Roomba compatible (57600 bps 8N1). First, make sure Serial Protocol is set to RS232. Next,
set the Speed setting to 57600, the bits per second speed the Roomba expects. Then, set
Character Size to 8, for 8-bit bytes, and the Parity to None. Finally, change the Flow Control
setting to 2, which means no flow control to the XPort. Leave all other settings alone. Click
Update Settings to complete the changes. You could also use the simpler Telnet configuration
interface to do the same thing. The Lantronix WiMicro Wi-Fi module in Chapter 12 is con-
figured almost exactly the same as the XPort and you’ll use Telnet to configure it.
FIGURE 11-16: XPort web interface