
Page 398 - Hacking Roomba
P. 398
Chapter 16 — Other Projects 379
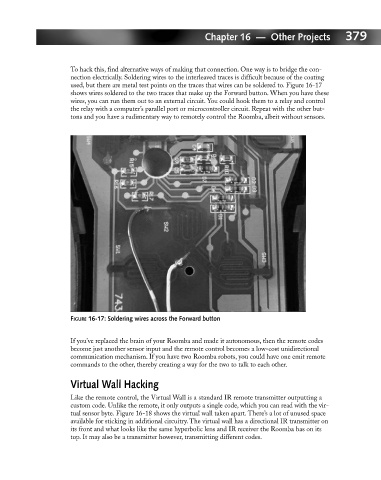
To hack this, find alternative ways of making that connection. One way is to bridge the con-
nection electrically. Soldering wires to the interleaved traces is difficult because of the coating
used, but there are metal test points on the traces that wires can be soldered to. Figure 16-17
shows wires soldered to the two traces that make up the Forward button. When you have these
wires, you can run them out to an external circuit. You could hook them to a relay and control
the relay with a computer’s parallel port or microcontroller circuit. Repeat with the other but-
tons and you have a rudimentary way to remotely control the Roomba, albeit without sensors.
FIGURE 16-17: Soldering wires across the Forward button
If you’ve replaced the brain of your Roomba and made it autonomous, then the remote codes
become just another sensor input and the remote control becomes a low-cost unidirectional
communication mechanism. If you have two Roomba robots, you could have one emit remote
commands to the other, thereby creating a way for the two to talk to each other.
Virtual Wall Hacking
Like the remote control, the Virtual Wall is a standard IR remote transmitter outputting a
custom code. Unlike the remote, it only outputs a single code, which you can read with the vir-
tual sensor byte. Figure 16-18 shows the virtual wall taken apart. There’s a lot of unused space
available for sticking in additional circuitry. The virtual wall has a directional IR transmitter on
its front and what looks like the same hyperbolic lens and IR receiver the Roomba has on its
top. It may also be a transmitter however, transmitting different codes.