
Page 25 - Programming the Photon Getting Started With the Internet of Things
P. 25
connected to your local Wi-Fi network, you can also control and program your Photon
with your smart phone using the Particle app in either IOS or Android operating systems.
The Photon board itself has lots of pin headers down each side of the board; these pins act
as the inputs and outputs for the microcontroller. These general-purpose pins can be
connected to sensors or buttons to listen to the world, or they can be connected to lights
and buzzers to put on a show. There are also pins that allow you to power your Photon
board, motors, and outputs of your device. In addition, the Photon board comes with some
built-in hardware features such as buttons and light-emitting diodes (LEDs), which make
things a lot easier when configuring the Photon board:
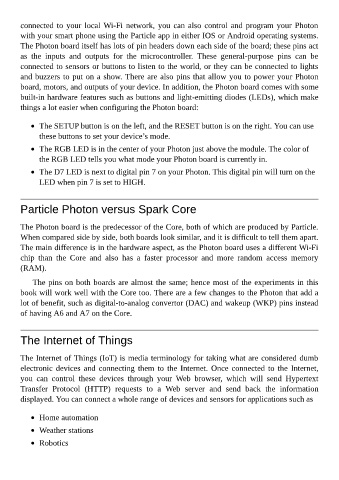
The SETUP button is on the left, and the RESET button is on the right. You can use
these buttons to set your device’s mode.
The RGB LED is in the center of your Photon just above the module. The color of
the RGB LED tells you what mode your Photon board is currently in.
The D7 LED is next to digital pin 7 on your Photon. This digital pin will turn on the
LED when pin 7 is set to HIGH.
Particle Photon versus Spark Core
The Photon board is the predecessor of the Core, both of which are produced by Particle.
When compared side by side, both boards look similar, and it is difficult to tell them apart.
The main difference is in the hardware aspect, as the Photon board uses a different Wi-Fi
chip than the Core and also has a faster processor and more random access memory
(RAM).
The pins on both boards are almost the same; hence most of the experiments in this
book will work well with the Core too. There are a few changes to the Photon that add a
lot of benefit, such as digital-to-analog convertor (DAC) and wakeup (WKP) pins instead
of having A6 and A7 on the Core.
The Internet of Things
The Internet of Things (IoT) is media terminology for taking what are considered dumb
electronic devices and connecting them to the Internet. Once connected to the Internet,
you can control these devices through your Web browser, which will send Hypertext
Transfer Protocol (HTTP) requests to a Web server and send back the information
displayed. You can connect a whole range of devices and sensors for applications such as
Home automation
Weather stations
Robotics