
Page 37 - 15 Dangerously Mad Projects for the Evil Genius
P. 37
18 15 Dangerously Mad Projects for the Evil Genius
Figure 2-6 The metal hook
You will need to use pliers to grip the hook
while you screw it into the end of the throwing
arm.
Step 3. Build the Base
The structure of the base is shown in Figure 2-7.
We start by fixing the two A-frames together at
the base, using two lengths of wood (J and K in
the cutting list) placed under the A-frames. There
should be a gap of about 7 inches (180mm)
between the A-frames at the base.
Also attach the central strut (L) that will hold
Figure 2-4 An “A” frame
the side braces, and piece (M) that runs down the
center of the base to support the runway board and
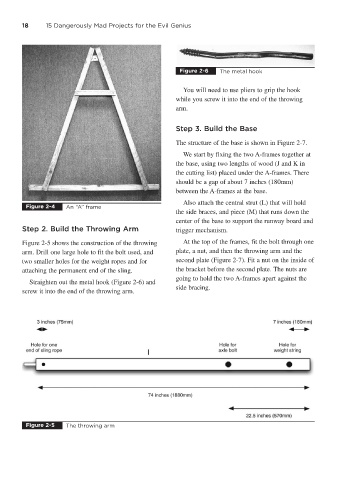
Step 2. Build the Throwing Arm trigger mechanism.
Figure 2-5 shows the construction of the throwing At the top of the frames, fit the bolt through one
arm. Drill one large hole to fit the bolt used, and plate, a nut, and then the throwing arm and the
two smaller holes for the weight ropes and for second plate (Figure 2-7). Fit a nut on the inside of
attaching the permanent end of the sling. the bracket before the second plate. The nuts are
going to hold the two A-frames apart against the
Straighten out the metal hook (Figure 2-6) and
side bracing.
screw it into the end of the throwing arm.
Figure 2-5 The throwing arm