
Page 78 - Build Your Own Combat Robot
P. 78
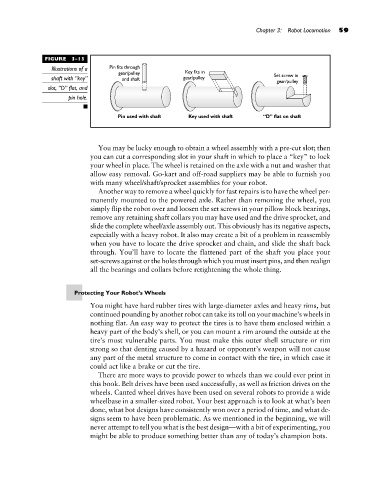
FIGURE  3-13                                             Chapter 3:  Robot Locomotion  59
                          Illustrations of a
                          shaft with “key”
                         slot, “D” flat, and
                              pin hole.


                                      You may be lucky enough to obtain a wheel assembly with a pre-cut slot; then
                                    you can cut a corresponding slot in your shaft in which to place a “key” to lock
                                    your wheel in place. The wheel is retained on the axle with a nut and washer that
                                    allow easy removal. Go-kart and off-road suppliers may be able to furnish you
                                    with many wheel/shaft/sprocket assemblies for your robot.
                                      Another way to remove a wheel quickly for fast repairs is to have the wheel per-
                                    manently mounted to the powered axle. Rather than removing the wheel, you
                                    simply flip the robot over and loosen the set screws in your pillow block bearings,
                                    remove any retaining shaft collars you may have used and the drive sprocket, and
                                    slide the complete wheel/axle assembly out. This obviously has its negative aspects,
                                    especially with a heavy robot. It also may create a bit of a problem in reassembly
                                    when you have to locate the drive sprocket and chain, and slide the shaft back
                                    through. You’ll have to locate the flattened part of the shaft you place your
                                    set-screws against or the holes through which you must insert pins, and then realign
                                    all the bearings and collars before retightening the whole thing.


                                Protecting Your Robot’s Wheels
                                    You might have hard rubber tires with large-diameter axles and heavy rims, but
                                    continued pounding by another robot can take its toll on your machine’s wheels in
                                    nothing flat. An easy way to protect the tires is to have them enclosed within a
                                    heavy part of the body’s shell, or you can mount a rim around the outside at the
                                    tire’s most vulnerable parts. You must make this outer shell structure or rim
                                    strong so that denting caused by a hazard or opponent’s weapon will not cause
                                    any part of the metal structure to come in contact with the tire, in which case it
                                    could act like a brake or cut the tire.
                                      There are more ways to provide power to wheels than we could ever print in
                                    this book. Belt drives have been used successfully, as well as friction drives on the
                                    wheels. Canted wheel drives have been used on several robots to provide a wide
                                    wheelbase in a smaller-sized robot. Your best approach is to look at what’s been
                                    done, what bot designs have consistently won over a period of time, and what de-
                                    signs seem to have been problematic. As we mentioned in the beginning, we will
                                    never attempt to tell you what is the best design—with a bit of experimenting, you
                                    might be able to produce something better than any of today’s champion bots.