
Page 65 - Build Your Own Quadcopter_ Power Up Your Designs with the Parallax Elev-8
P. 65
44 Bu il d Y o ur O w n Q u a d c o p t e r
Beginning the Build
I have now come to the point where the actual build starts. Remember to have all the
recommended tools, all the kit parts, and a well-lighted and comfortable work area available.
These steps will go a long way in making the whole build experience enjoyable.
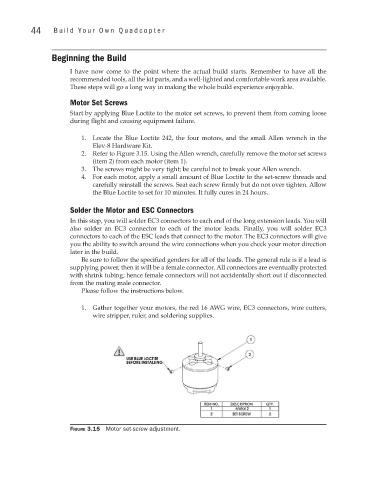
Motor Set Screws
Start by applying Blue Loctite to the motor set screws, to prevent them from coming loose
during flight and causing equipment failure.
1. Locate the Blue Loctite 242, the four motors, and the small Allen wrench in the
Elev-8 Hardware Kit.
2. Refer to Figure 3.15. Using the Allen wrench, carefully remove the motor set screws
(item 2) from each motor (item 1).
3. The screws might be very tight; be careful not to break your Allen wrench.
4. For each motor, apply a small amount of Blue Loctite to the set-screw threads and
carefully reinstall the screws. Seat each screw firmly but do not over tighten. Allow
the Blue Loctite to set for 10 minutes. It fully cures in 24 hours.
Solder the Motor and ESC Connectors
In this step, you will solder EC3 connectors to each end of the long extension leads. You will
also solder an EC3 connector to each of the motor leads. Finally, you will solder EC3
connectors to each of the ESC leads that connect to the motor. The EC3 connectors will give
you the ability to switch around the wire connections when you check your motor direction
later in the build.
Be sure to follow the specified genders for all of the leads. The general rule is if a lead is
supplying power, then it will be a female connector. All connectors are eventually protected
with shrink tubing; hence female connectors will not accidentally short out if disconnected
from the mating male connector.
Please follow the instructions below.
1. Gather together your motors, the red 16 AWG wire, EC3 connectors, wire cutters,
wire stripper, ruler, and soldering supplies.
Figure 3.15 Motor set-screw adjustment.