Page 90 - Challenges in Corrosion Costs Causes Consequences and Control(2015)
P. 90
68                                INTRODUCTION AND FORMS OF CORROSION

           1.8.2  Types of Tests
           (i) cycles-to-failure (complete fracture) or (ii) crack propagation (crack growth) test.
           In the cycles-to-failure test, samples are subjected to a number of stress cycles to
           initiate and propagate cracks until complete fracture occurs. This test involves using
           smooth or notched samples. This test cannot distinguish between corrosion fatigue
           crack (CFC) initiation and CFC propagation.


           1.8.3  Sampling in CF Tests
           A sample has generally three regions; namely, a test section and two grip ends. The
           design and type of sample depends on the fatigue testing machine and the objective
           of the study. The test section of the sample is of reduced cross section to prevent
           failure at the grip ends. Rounded samples used in axial fatigue may be threaded,
           buttonhead or constant-diameter types for clamping in V-wedge pressure grips. In
           rotating-beam machines, short, tapered grip ends with internal threads are used, and
           the sample pulled into the grip by a draw bar. Torsional fatigue samples are generally
           cylindrical. Flat samples for axial or bending fatigue tests may be generally reduced
           in width and thickness in the rest of the section (4).
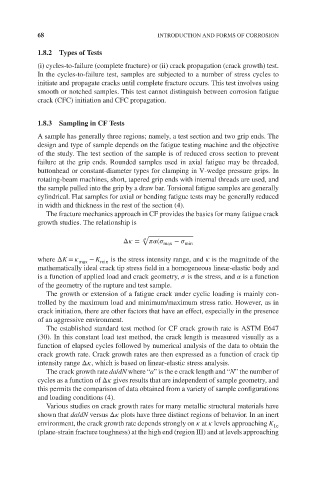
              The fracture mechanics approach in CF provides the basics for many fatigue crack
           growth studies. The relationship is

                                        √

                                   Δ   =      (   max  −    min
           where ΔK =    max  − K min  is the stress intensity range, and    is the magnitude of the
           mathematically ideal crack tip stress field in a homogeneous linear-elastic body and
           is a function of applied load and crack geometry,    is the stress, and    is a function
           of the geometry of the rupture and test sample.
              The growth or extension of a fatigue crack under cyclic loading is mainly con-
           trolled by the maximum load and minimum/maximum stress ratio. However, as in
           crack initiation, there are other factors that have an effect, especially in the presence
           of an aggressive environment.
              The established standard test method for CF crack growth rate is ASTM E647
           (30). In this constant load test method, the crack length is measured visually as a
           function of elapsed cycles followed by numerical analysis of the data to obtain the
           crack growth rate. Crack growth rates are then expressed as a function of crack tip
           intensity range Δ  , which is based on linear-elastic stress analysis.
              The crack growth rate da/dN where “a” is the e crack length and “N” the number of
           cycles as a function of Δ   gives results that are independent of sample geometry, and
           this permits the comparison of data obtained from a variety of sample configurations
           and loading conditions (4).
              Various studies on crack growth rates for many metallic structural materials have
           shown that da/dN versus Δ   plots have three distinct regions of behavior. In an inert
           environment, the crack growth rate depends strongly on    at    levels approaching K 1c
           (plane-strain fracture toughness) at the high end (region III) and at levels approaching

