
Page 203 - Hacking Roomba
P. 203
184 Part II — Fun Things to Do
Drawing Spirals with RoombaSpiro
Turning SpiroExplorer into a program that controls Roomba is pretty easy with the mathemat-
ical tools you already have available to you. The first step is to add the standard RoombaComm
initialization and control statements to your Processing sketch, just like in Chapter 7. Copy
and paste are your friend here. The next step is to figure how to transform the SpiroExplorer
equations into Roomba commands.
For every time increment dt in SpiroExplorer, the line moves the old point xo,yo to the new
point x,y. The resulting dx,dy incremental movement is actually a vector, and you can calculate
the angle of that vector using the arctangent. From that angle you can find the radius of the
circle to command Roomba with to follow that vector.
Listing 9-2 shows the updated draw() method with the radius calculation and the Roomba
drive() command. Two different methods of finding the radius are shown. You can use either
one as the radius for the drive() command. Note that the speed is constant since it represents
time to the robot. These few extra lines turn SpiroExplorer into RoombaSpiro. In the initial-
ization of RoombaSpiro, you may want to put Roomba in full mode so it keeps going when
you pick it up.
The rscale value scales up the computed radius to a usable radius. Experiment with different
rscale values to see how they affect the Roomba’s behavior.
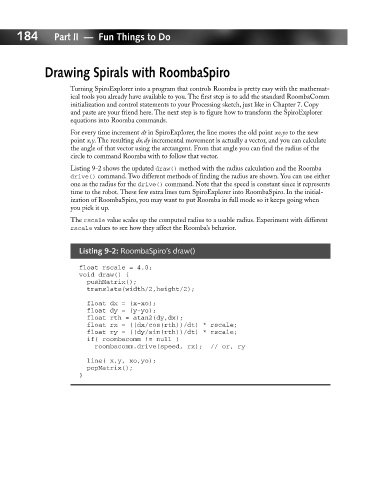
Listing 9-2: RoombaSpiro’s draw()
float rscale = 4.0;
void draw() {
pushMatrix();
translate(width/2,height/2);
float dx = (x-xo);
float dy = (y-yo);
float rth = atan2(dy,dx);
float rx = ((dx/cos(rth))/dt) * rscale;
float ry = ((dy/sin(rth))/dt) * rscale;
if( roombacomm != null )
roombacomm.drive(speed, rx); // or, ry
line( x,y, xo,yo);
popMatrix();
}