
Page 265 - Hacking Roomba
P. 265
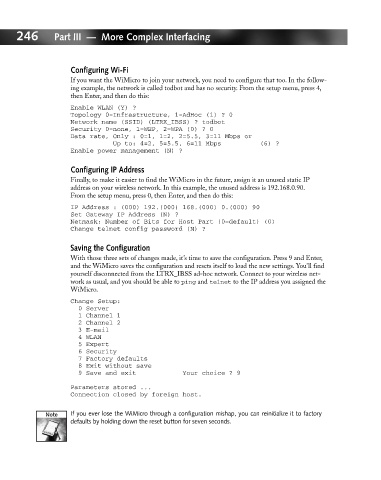
246       Part III — More Complex Interfacing


                             Configuring Wi-Fi
                             If you want the WiMicro to join your network, you need to configure that too. In the follow-
                             ing example, the network is called todbot and has no security. From the setup menu, press 4,
                             then Enter, and then do this:
                             Enable WLAN (Y) ?
                             Topology 0=Infrastructure, 1=AdHoc (1) ? 0
                             Network name (SSID) (LTRX_IBSS) ? todbot
                             Security 0=none, 1=WEP, 2=WPA (0) ? 0
                             Data rate, Only : 0=1, 1=2, 2=5.5, 3=11 Mbps or
                                        Up to: 4=2, 5=5.5, 6=11 Mbps          (6) ?
                             Enable power management (N) ?

                             Configuring IP Address
                             Finally, to make it easier to find the WiMicro in the future, assign it an unused static IP
                             address on your wireless network. In this example, the unused address is 192.168.0.90.
                             From the setup menu, press 0, then Enter, and then do this:
                             IP Address : (000) 192.(000) 168.(000) 0.(000) 90
                             Set Gateway IP Address (N) ?
                             Netmask: Number of Bits for Host Part (0=default) (0)
                             Change telnet config password (N) ?


                             Saving the Configuration
                             With those three sets of changes made, it’s time to save the configuration. Press 9 and Enter,
                             and the WiMicro saves the configuration and resets itself to load the new settings. You’ll find
                             yourself disconnected from the LTRX_IBSS ad-hoc network. Connect to your wireless net-
                             work as usual, and you should be able to ping and telnet to the IP address you assigned the
                             WiMicro.
                             Change Setup:
                               0 Server
                               1 Channel 1
                               2 Channel 2
                               3 E-mail
                               4 WLAN
                               5 Expert
                               6 Security
                               7 Factory defaults
                               8 Exit without save
                               9 Save and exit            Your choice ? 9

                             Parameters stored ...
                             Connection closed by foreign host.

                             If you ever lose the WiMicro through a configuration mishap, you can reinitialize it to factory
                             defaults by holding down the reset button for seven seconds.