
Page 346 - Hacking Roomba
P. 346
Chapter 14 — Putting Linux on Roomba 327
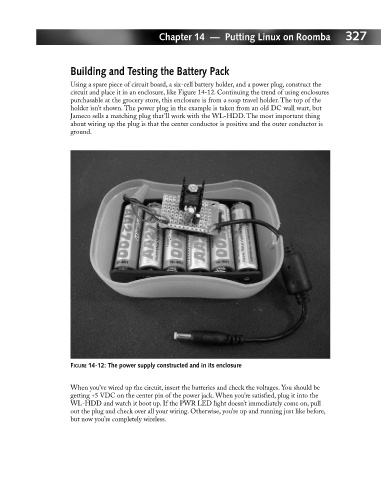
Building and Testing the Battery Pack
Using a spare piece of circuit board, a six-cell battery holder, and a power plug, construct the
circuit and place it in an enclosure, like Figure 14-12. Continuing the trend of using enclosures
purchasable at the grocery store, this enclosure is from a soap travel holder. The top of the
holder isn’t shown. The power plug in the example is taken from an old DC wall wart, but
Jameco sells a matching plug that’ll work with the WL-HDD. The most important thing
about wiring up the plug is that the center conductor is positive and the outer conductor is
ground.
FIGURE 14-12: The power supply constructed and in its enclosure
When you’ve wired up the circuit, insert the batteries and check the voltages. You should be
getting +5 VDC on the center pin of the power jack. When you’re satisfied, plug it into the
WL-HDD and watch it boot up. If the PWR LED light doesn’t immediately come on, pull
out the plug and check over all your wiring. Otherwise, you’re up and running just like before,
but now you’re completely wireless.