Page 390 - Introduction to Marine Engineering
P. 390
360   Appendix

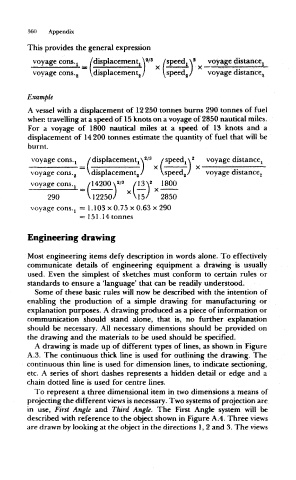
                 This provides  the general  expression
                  voyage eons.j  /displacement W  8  /speedA 2   voyage distance^
                  voyage cons.g  \displacement 2/    \speed 2/   voyage distance^


                 Example
                 A vessel  with a displacement of  12250 tonnes burns 290 tonnes of  fuel
                 when travelling at a speed of  15 knots on a voyage of 2850 nautical miles.
                 For  a  voyage  of  1800  nautical  miles  at  a  speed  of  13  knots  and  a
                 displacement  of  14 200 tonnes estimate  the  quantity of  fuel  that  will be
                 burnt.
                  voyage cons.j  / displacement \ 2/3  /speeds 2  voyage distancCj
                   m,, |[|J|_ J  uJ T-II—i- i- in i imiiujiii LTim LI ii IT-  -nrniui.  I  m rni nil. ..urir  " I  '  -iminuiuii TI -ini—  i  i  i  I  \f  I  JIITI 1.111.11111111111  I  \f  1.11.11111 vimm—T I  L  J I I I  I  i rain TI imi—tini'i 11J nirrT-.-..._..
                                 \displacement 2/   Vspeedg/    voyage distance,,
                  voyage cons. 2
                                        2 3
                  voyage cons.j  _  /14200\ /  /I3\  z  1800
                      290        X12250/     \15/   2850
                  voyage cons^  =  1.103 x 0.75 x 0.63 x 290
                               =  151.14 tonnes

                 Engineering drawing

                 Most  engineering  items defy  description  in words alone.  To  effectively
                 communicate  details  of  engineering  equipment  a  drawing  is usually
                 used.  Even  the  simplest  of  sketches must  conform  to  certain  rules  or
                 standards  to ensure  a 'language' that can be readily  understood.
                   Some  of these basic  rules will now be described  with the  intention of
                 enabling  the  production  of  a  simple  drawing  for  manufacturing  or
                 explanation  purposes. A drawing produced as a piece of information  or
                 communication  should  stand  alone,  that  is,  no  further  explanation
                 should  be  necessary.  All necessary  dimensions  should  be  provided  on
                 the  drawing  and  the  materials  to be used should  be  specified.
                   A drawing  is made  up  of different  types of  lines, as shown in  Figure
                 A.3.  The  continuous  thick line is used  for  outlining  the  drawing.  The
                 continuous thin  line is used  for  dimension  lines,  to indicate  sectioning,
                 etc.  A series  of  short  dashes  represents a  hidden  detail  or  edge  and  a
                 chain  dotted  line is used for  centre  lines.
                   To  represent  a three dimensional item in two dimensions a means of
                 projecting the different views is necessary. Two systems of projection  are
                 in  use,  First  Angle  and  Third  Angle. The  First  Angle  system  will  be
                 described  with reference  to the  object shown in Figure A.4. Three views
                 are drawn by looking at the object  in the directions  1, 2 and  3. The  views

