Page 139 - Mechanical Engineers' Handbook (Volume 2)
P. 139
128   Measurements
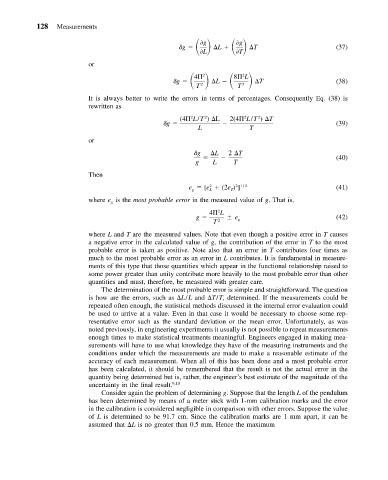
                                                    g        L
                                                          g
                                                                    g
                                                          L        T   T                      (37)
                          or
                                                  g          L
                                                                    2
                                                       4
                                                         2
                                                                  8  L
                                                       T  2        T  3   T                   (38)
                          It is always better to write the errors in terms of percentages. Consequently Eq. (38) is
                          rewritten as
                                                                     2
                                                                         2
                                                   (4  L/T )  L  2(4  L/T )  T
                                                          2
                                                      2
                                               g                                              (39)
                                                        L             T
                          or
                                                        g   L    2  T
                                                                                              (40)
                                                       g    L     T
                          Then
                                                     e   [e   (2e ) ]                         (41)
                                                                  2 1 / 2
                                                           2
                                                      g
                                                           L
                                                                 T
                          where e is the most probable error in the measured value of g. That is,
                                g
                                                           4  L
                                                              2
                                                       g          e g                         (42)
                                                            T  2
                          where L and T are the measured values. Note that even though a positive error in T causes
                          a negative error in the calculated value of g, the contribution of the error in T to the most
                          probable error is taken as positive. Note also that an error in T contributes four times as
                          much to the most probable error as an error in L contributes. It is fundamental in measure-
                          ments of this type that those quantities which appear in the functional relationship raised to
                          some power greater than unity contribute more heavily to the most probable error than other
                          quantities and must, therefore, be measured with greater care.
                             The determination of the most probable error is simple and straightforward. The question
                          is how are the errors, such as  L/L and  T/T, determined. If the measurements could be
                          repeated often enough, the statistical methods discussed in the internal error evaluation could
                          be used to arrive at a value. Even in that case it would be necessary to choose some rep-
                          resentative error such as the standard deviation or the mean error. Unfortunately, as was
                          noted previously, in engineering experiments it usually is not possible to repeat measurements
                          enough times to make statistical treatments meaningful. Engineers engaged in making mea-
                          surements will have to use what knowledge they have of the measuring instruments and the
                          conditions under which the measurements are made to make a reasonable estimate of the
                          accuracy of each measurement. When all of this has been done and a most probable error
                          has been calculated, it should be remembered that the result is not the actual error in the
                          quantity being determined but is, rather, the engineer’s best estimate of the magnitude of the
                          uncertainty in the final result. 9,10
                             Consider again the problem of determining g. Suppose that the length L of the pendulum
                          has been determined by means of a meter stick with 1-mm calibration marks and the error
                          in the calibration is considered negligible in comparison with other errors. Suppose the value
                          of L is determined to be 91.7 cm. Since the calibration marks are 1 mm apart, it can be
                          assumed that  L is no greater than 0.5 mm. Hence the maximum

