Page 49 - Mechanics of Asphalt Microstructure and Micromechanics
P. 49
T
    42   Ch a p t e r w o

              PAV. Dog-bone shaped asphalt samples are tested in tension (pulled slowly) at low
              temperatures and constant rate (1 mm/min) to address the stiff and ductile characteris-
              tics of binders with a creep stiffness between 300 and 600 MPa. The elongation at failure
              is used to calculate the failure strain, which is an indication of whether the binder will
              behave in a brittle or ductile manner at the low test temperature. The failure strain (e f )
              is the change in length (ΔL) divided by the effective gauge length (L e ). For this test,
              failure is defined as the load when the stress reaches its maximum value, not necessar-
              ily the load when the specimen breaks. Failure stress (s f ) is the failure load divided by
                                                           2
              the original cross section area of the specimen (36 mm ). The specification requires that
              the failure strain must be a minimum of 1% at failure. Test specimens have a mass of
              approximately 3g and are 100 mm long, including the end inserts. Testing procedure is
              covered by ASTM D 6723 or AASTHO T 314.

              2.1.9.8  Fracture (Tensile) Strength in Cleavage

              Double Cantilever Beam (DCB)
              The DCB consists of two loading tabs on which two very thin asphalt beam specimens
              with thicknesses from 0.5 to 3 mm can be attached (Harvey and Cebon, 2003, 2005).
              Specimens are compressed for 30 min at 30°C and then tested at temperatures ranging
              from –30°C to 30°C. This test (ASTM D3433) is used to obtain the mode I fracture en-
              ergy of the asphalt bonds, which is a measure of the fracture toughness of the asphalt
              in the presence of flaws. Similar to a wedge test, a crack is initiated first by inserting a
              wedge. The specimen is then loaded by pulling apart the two beams at a certain rate;
              the increasing load results in increased deflection of the two beams. The applied forc-
              es are converted to stresses. At a certain critical load, the crack begins to propagate
              resulting in a slight drop in the load (due to the increased compliance). At this point,
              the beams are stopped from moving apart, thus keeping the deflection constant. Due
              to increasing crack length, the load and the crack length decrease. After the equilibra-
              tion of the crack, the specimen is repeatedly unloaded and then loaded until total
              cleavage of the specimen. The data collected at different times consist of load, deflec-
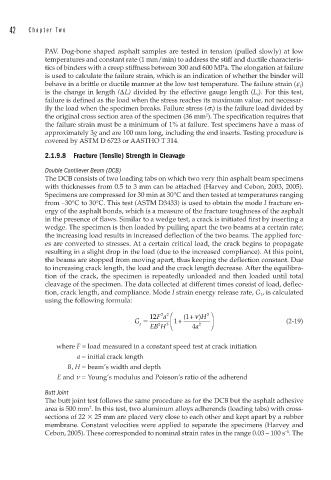
              tion, crack length, and compliance. Mode I strain energy release rate, G 1 , is calculated
              using the following formula:

                                              22
                                                           2
                                           12 Fa ⎛  ( 1+ ) ν H ⎞
                                       G        3 ⎜ 1+      ⎟                    (2-19)
                                             2
                                        I  EB H ⎝       a 4  2  ⎠
                  where F = load measured in a constant speed test at crack initiation
                       a = initial crack length
                    B, H = beam’s width and depth
                 E and n = Young’s modulus and Poisson’s ratio of the adherend
              Butt Joint
              The butt joint test follows the same procedure as for the DCB but the asphalt adhesive
              area is 500 mm . In this test, two aluminum alloys adherends (loading tabs) with cross-
                          2
              sections of 22   25 mm are placed very close to each other and kept apart by a rubber
              membrane. Constant velocities were applied to separate the specimens (Harvey and
                                                                                 –1
              Cebon, 2005). These corresponded to nominal strain rates in the range 0.03 – 100 s . The

