
Page 16 - Programming the Raspberry Pi Getting Started with Python
P. 16
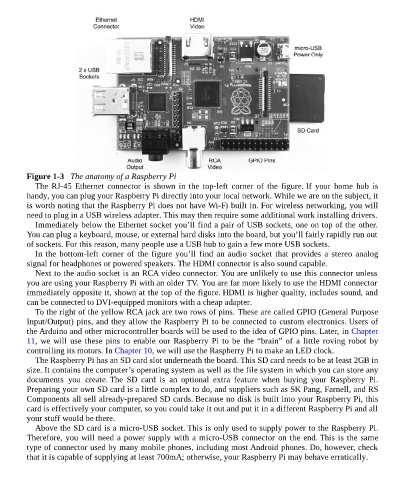
Figure 1-3   The anatomy of a Raspberry Pi
             The RJ-45 Ethernet connector is shown in the top-left corner of the figure. If  your  home  hub  is
          handy, you can plug your Raspberry Pi directly into your local network. While we are on the subject, it
          is worth noting that the Raspberry Pi does not have Wi-Fi built in. For wireless networking, you will
          need to plug in a USB wireless adapter. This may then require some additional work installing drivers.
             Immediately below the Ethernet socket you’ll find a pair of USB sockets, one on top of the other.

          You can plug a keyboard, mouse, or external hard disks into the board, but you’ll fairly rapidly run out
          of sockets. For this reason, many people use a USB hub to gain a few more USB sockets.
             In the bottom-left corner of the figure you’ll find an audio socket that provides a stereo analog
          signal for headphones or powered speakers. The HDMI connector is also sound capable.
             Next to the audio socket is an RCA video connector. You are unlikely to use this connector unless
          you are using your Raspberry Pi with an older TV.  You are far more likely to use the HDMI connector
          immediately opposite it, shown at the top of the figure. HDMI is higher quality, includes sound, and
          can be connected to DVI-equipped monitors with a cheap adapter.
             To the right of the yellow RCA jack are two rows of pins. These are called GPIO (General Purpose
          Input/Output) pins, and they allow the Raspberry Pi to be connected to custom electronics. Users of
          the Arduino and other microcontroller boards will be used to the idea of GPIO pins. Later, in Chapter
          11, we will use these pins to enable our Raspberry Pi to be the “brain” of a little roving robot by
          controlling its motors. In Chapter 10, we will use the Raspberry Pi to make an LED clock.
             The Raspberry Pi has an SD card slot underneath the board. This SD card needs to be at least 2GB in
          size. It contains the computer’s operating system as well as the file system in which you can store any
          documents  you  create. The  SD  card  is  an  optional  extra  feature  when  buying  your  Raspberry  Pi.

          Preparing your own SD card is a little complex to do, and suppliers such as SK Pang, Farnell, and RS
          Components all sell already-prepared SD cards. Because no disk is built into your Raspberry Pi, this
          card is effectively your computer, so you could take it out and put it in a different Raspberry Pi and all
          your stuff would be there.
             Above the SD card is a micro-USB socket. This is only used to supply power to the Raspberry Pi.
          Therefore, you will need a power supply with a micro-USB connector on the end. This is the same
          type of connector used by many mobile phones, including most Android phones. Do, however, check
          that it is capable of supplying at least 700mA; otherwise, your Raspberry Pi may behave erratically.