
Page 318 - Well Control for Completions and Interventions
P. 318
Well Kill, Kick Detection, and Well Shut-In 309
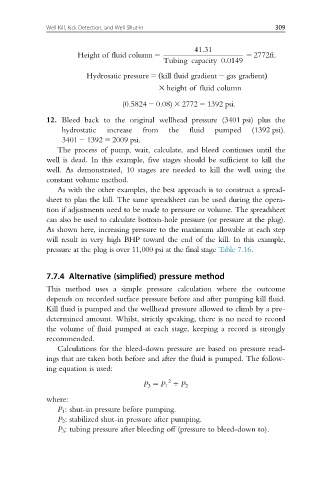
41:31
Height of fluid column 5 5 2772ft:
Tubing capacity 0:0149
ð
Hydrosatic pressure 5 kill fluid gradient 2 gas gradientÞ
3 height of fluid column
(0.5824 2 0.08) 3 2772 5 1392 psi.
12. Bleed back to the original wellhead pressure (3401 psi) plus the
hydrostatic increase from the fluid pumped (1392 psi).
3401 2 1392 5 2009 psi.
The process of pump, wait, calculate, and bleed continues until the
well is dead. In this example, five stages should be sufficient to kill the
well. As demonstrated, 10 stages are needed to kill the well using the
constant volume method.
As with the other examples, the best approach is to construct a spread-
sheet to plan the kill. The same spreadsheet can be used during the opera-
tion if adjustments need to be made to pressure or volume. The spreadsheet
can also be used to calculate bottom-hole pressure (or pressure at the plug).
As shown here, increasing pressure to the maximum allowable at each step
will result in very high BHP toward the end of the kill. In this example,
pressure at the plug is over 11,000 psi at the final stage Table 7.16.
7.7.4 Alternative (simplified) pressure method
This method uses a simple pressure calculation where the outcome
depends on recorded surface pressure before and after pumping kill fluid.
Kill fluid is pumped and the wellhead pressure allowed to climb by a pre-
determined amount. Whilst, strictly speaking, there is no need to record
the volume of fluid pumped at each stage, keeping a record is strongly
recommended.
Calculations for the bleed-down pressure are based on pressure read-
ings that are taken both before and after the fluid is pumped. The follow-
ing equation is used:
2
P 3 5 P 1 4 P 2
where:
P 1 : shut-in pressure before pumping.
P 2 : stabilized shut-in pressure after pumping.
P 3 : tubing pressure after bleeding off (pressure to bleed-down to).