
Page 159 - Amphibionics : Build Your Own Biologically Inspired Robot
P. 159
Amphibionics 05 3/24/03 8:44 AM Page 138
Amphibionics
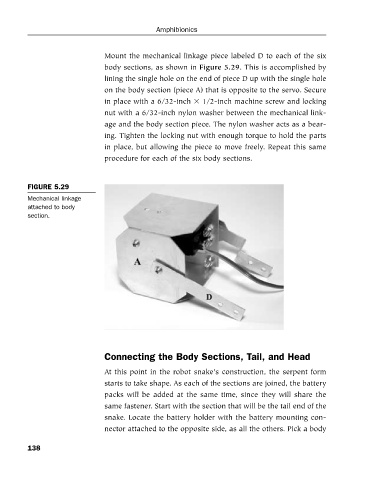
Mount the mechanical linkage piece labeled D to each of the six
body sections, as shown in Figure 5.29. This is accomplished by
lining the single hole on the end of piece D up with the single hole
on the body section (piece A) that is opposite to the servo. Secure
in place with a 6/32-inch 1/2-inch machine screw and locking
nut with a 6/32-inch nylon washer between the mechanical link-
age and the body section piece. The nylon washer acts as a bear-
ing. Tighten the locking nut with enough torque to hold the parts
in place, but allowing the piece to move freely. Repeat this same
procedure for each of the six body sections.
FIGURE 5.29
Mechanical linkage
attached to body
section.
Connecting the Body Sections, Tail, and Head
At this point in the robot snake’s construction, the serpent form
starts to take shape. As each of the sections are joined, the battery
packs will be added at the same time, since they will share the
same fastener. Start with the section that will be the tail end of the
snake. Locate the battery holder with the battery mounting con-
nector attached to the opposite side, as all the others. Pick a body
138