Page 287 - Analysis and Design of Machine Elements
P. 287
Shafts
                          is subjected to both bending moments and torques, that is, a transmission shaft, the  265
                          combination of bending and torsion approach is used and fatigue strength analysis is
                          performed when necessary. Static strength is calculated at peak loads to avoid excessive
                          plastic deformation if a shaft is subjected to overload impact. The structure of the shaft
                          needs to be modified if the strength does not meet requirements. After strength anal-
                          ysis, either the minimum shaft diameter to successfully support the loads or the safety
                          factor for a specific design can be determined.

                          10.3.1.1  Torsional Strength Analysis
                          A spindle carries an operating torque only. The torsional shear stress at the critical
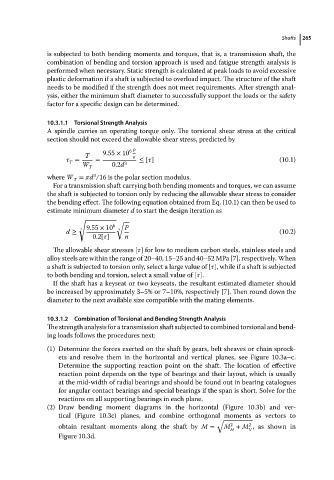
                          section should not exceed the allowable shear stress, predicted by

                                          9.55 × 10 6 P
                                     T             n
                                  =     =           ≤ [  ]                                   (10.1)
                                T
                                    W T      0.2d 3
                                       3
                          where W =   d /16 is the polar section modulus.
                                  T
                            For a transmission shaft carrying both bending moments and torques, we can assume
                          the shaft is subjected to torsion only by reducing the allowable shear stress to consider
                          the bending effect. The following equation obtained from Eq. (10.1) can then be used to
                          estimate minimum diameter d to start the design iteration as
                                   √
                                              √
                                    3 9.55 × 10 6  3 P
                               d ≥                                                           (10.2)
                                       0.2[  ]  n
                            The allowable shear stresses [  ] for low to medium carbon steels, stainless steels and
                          alloy steels are within the range of 20–40, 15–25 and 40–52 MPa [7], respectively. When
                          a shaft is subjected to torsion only, select a large value of [  ], while if a shaft is subjected
                          to both bending and torsion, select a small value of [  ].
                            If the shaft has a keyseat or two keyseats, the resultant estimated diameter should
                          be increased by approximately 3–5% or 7–10%, respectively [7]. Then round down the
                          diameter to the next available size compatible with the mating elements.


                          10.3.1.2  Combination of Torsional and Bending Strength Analysis
                          The strength analysis for a transmission shaft subjected to combined torsional and bend-
                          ing loads follows the procedures next:

                          (1) Determine the forces exerted on the shaft by gears, belt sheaves or chain sprock-
                             ets and resolve them in the horizontal and vertical planes, see Figure 10.3a–c.
                             Determine the supporting reaction point on the shaft. The location of effective
                             reaction point depends on the type of bearings and their layout, which is usually
                             at the mid-width of radial bearings and should be found out in bearing catalogues
                             for angular contact bearings and special bearings if the span is short. Solve for the
                             reactions on all supporting bearings in each plane.
                          (2) Draw bending moment diagrams in the horizontal (Figure 10.3b) and ver-
                             tical (Figure 10.3c) planes, and combine orthogonal moments as vectors to
                                                                           √
                                                                               2
                                                                                    2
                             obtain resultant moments along the shaft by M =  M + M ,asshown in
                                                                               H    V
                             Figure 10.3d.

