Page 71 - Biaxial Multiaxial Fatigue and Fracture
P. 71
56                         E LABESSEJIED ET AL.

             Mean residual stresses. The mean residual stresses were measured on the surface of the toe of
             the bead with means of X-Rays diffraction. They reach 25 MPa and 37 MPa in the transversal
             and longitudinal directions respectively.


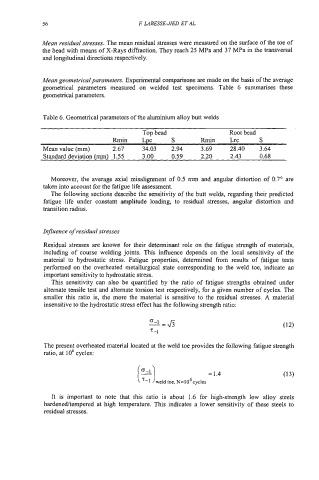
             Mean geometricalparameters. Experimental comparisons are made on the basis of the average
             geometrical  parameters  measured  on  welded  test  specimens.  Table  6  summarises  these
             geometrical parameters.


             Table 6. Geometrical parameters of the aluminium alloy butt welds

                                          Tor, bead               Root bead
                                 bin     ~pl:     S       Rmin    Lrc      S
             Mean value (mm)     2.67    34.03    2.94    3.69    28.40    3.64
             Standard deviation (mm)  1.55   3.00   0.59   2.20   2.43     0.68


               Moreover, the  average axial misalignment of 0.5  mm and  angular distortion of 0.7"  are
             taken into account for the fatigue life assessment.
               The following sections describe the sensitivity of the butt welds, regarding their predicted
             fatigue  life  under  constant  amplitude  loading,  to  residual  stresses,  angular  distortion  and
             transition radius.


             Imjluence of residual stresses

             Residual  stresses are known for their  determinant role on the  fatigue strength of materials,
             including  of course  welding joints.  This  influence depends  on  the  local  sensitivity  of  the
             material  to  hydrostatic  stress.  Fatigue  properties,  determined  from  results  of  fatigue  tests
             performed  on  the  overheated metallurgical state corresponding to  the weld  toe,  indicate an
             important sensitivity to hydrostatic stress.
                This  sensitivity  can  also  be  quantified  by  the  ratio  of fatigue  strengths  obtained  under
             alternate tensile test and alternate torsion test respectively, for a given number of cycles. The
             smaller this  ratio  is,  the  more the material  is  sensitive to  the residual  stresses. A  material
             insensitive to the hydrostatic stress effect has the following strength ratio:


             The present overheated material located at the weld toe provides the following fatigue strength
             ratio, at 1 o6 cycles:


                It  is  important  to  note  that  this  ratio  is  about  1.6  for  high-strength  low  alloy  steels
             hardendtempered  at  high temperature. This indicates a  lower sensitivity of these steels to
             residual stresses.

