
Page 126 - Enhancing CAD Drawings with Photoshop
P. 126
4386.book Page 109 Monday, November 15, 2004 3:27 PM
EXTRACTING ENTOURAGE 109
Saving the Extraction as an Alpha Channel
Now that you have extracted the figure and sharpened the image, you might think you are done. In
fact you are almost there, but a few important details remain. For entourage to work in most 3D pro-
grams, you will need to save an alpha channel. The alpha is a grayscale channel that shows where the
figure is opaque, translucent, and/or transparent. Traditionally, white represents opaque regions,
black is for transparent areas (where the figure is not), and shades of gray are translucent zones (hair,
for example).
The alpha channel gets its name because it is the first extra channel in addition to the color chan-
nels (Red, Green, and Blue). If each channel stores 8 bits/pixels, an alpha channel RGB image is a 32-
bit image (see Chapter 1, “The Basics”). Although you can store as many channels as desired, the
alpha is the most commonly used. In Photoshop CS, an image can have a maximum of 56 channels.
Currently, the figure is represented by RGB pixels on the Woman Standing layer. There simply are
no pixels in the areas of the image where the figure is not; this absence of pixels is known as trans-
parency. We can use the Calculations tool to convert transparency to an alpha channel.
NOTE If you extracted the figure using a technique that left pixels outside the figure (not shown in
this tutorial), you would have to create the alpha channel by making a selection.
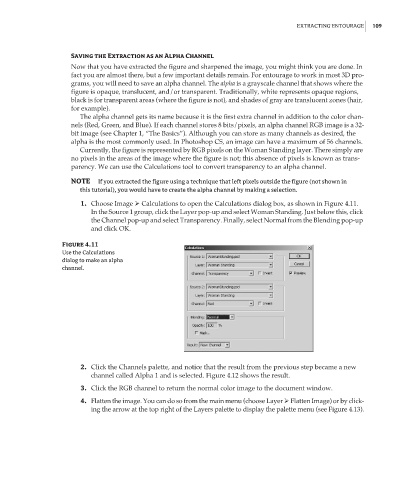
1. Choose Image Calculations to open the Calculations dialog box, as shown in Figure 4.11.
In the Source 1 group, click the Layer pop-up and select Woman Standing. Just below this, click
the Channel pop-up and select Transparency. Finally, select Normal from the Blending pop-up
and click OK.
Figure 4.11
Use the Calculations
dialog to make an alpha
channel.
2. Click the Channels palette, and notice that the result from the previous step became a new
channel called Alpha 1 and is selected. Figure 4.12 shows the result.
3. Click the RGB channel to return the normal color image to the document window.
4. Flatten the image. You can do so from the main menu (choose Layer Flatten Image) or by click-
ing the arrow at the top right of the Layers palette to display the palette menu (see Figure 4.13).