
Page 110 - Excel 2007 Bible
P. 110
08_044039 ch04.qxp 11/21/06 10:56 AM Page 67
To insert a new row or rows, you can use any of these techniques:
n Select an entire row or multiple rows by clicking the row numbers in the worksheet border. Right-
click and choose Insert from the shortcut menu.
n Move the cell pointer to the row that you want to insert and then choose Home ➪ Cells ➪
Insert ➪ Insert Sheet Rows. If you select multiple cells in the column, Excel inserts additional
rows that correspond to the number of cells selected in the column and moves the rows below
the insertion down.
The procedures for inserting a new column or columns is similar, but you choose Home ➪ Cells ➪
Insert ➪ Insert Sheet Columns.
You also can insert cells, rather than just rows or columns. Select the range into which you want to add new
cells and then choose Home ➪ Cells ➪ Insert ➪ Insert Cells (or right-click the selection and choose
Insert). To insert cells, the existing cells must be shifted to the right or shifted down. Therefore, Excel dis-
plays the Insert dialog box shown in Figure 4.12 so that you can specify the direction in which you want to
shift the cells.
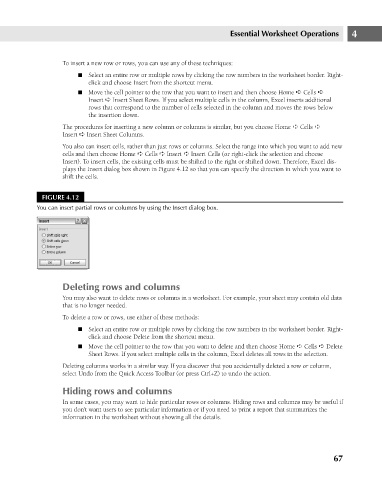
FIGURE 4.12
You can insert partial rows or columns by using the Insert dialog box. Essential Worksheet Operations 4
Deleting rows and columns
You may also want to delete rows or columns in a worksheet. For example, your sheet may contain old data
that is no longer needed.
To delete a row or rows, use either of these methods:
n Select an entire row or multiple rows by clicking the row numbers in the worksheet border. Right-
click and choose Delete from the shortcut menu.
n Move the cell pointer to the row that you want to delete and then choose Home ➪ Cells ➪ Delete
Sheet Rows. If you select multiple cells in the column, Excel deletes all rows in the selection.
Deleting columns works in a similar way. If you discover that you accidentally deleted a row or column,
select Undo from the Quick Access Toolbar (or press Ctrl+Z) to undo the action.
Hiding rows and columns
In some cases, you may want to hide particular rows or columns. Hiding rows and columns may be useful if
you don’t want users to see particular information or if you need to print a report that summarizes the
information in the worksheet without showing all the details.
67