
Page 215 - Handbook of Adhesives and Sealants
P. 215
186 Chapter Five
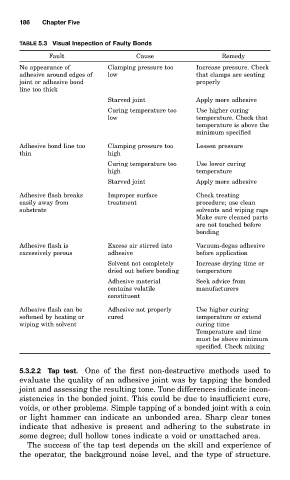
TABLE 5.3 Visual Inspection of Faulty Bonds
Fault Cause Remedy
No appearance of Clamping pressure too Increase pressure. Check
adhesive around edges of low that clamps are seating
joint or adhesive bond properly
line too thick
Starved joint Apply more adhesive
Curing temperature too Use higher curing
low temperature. Check that
temperature is above the
minimum specified
Adhesive bond line too Clamping pressure too Lessen pressure
thin high
Curing temperature too Use lower curing
high temperature
Starved joint Apply more adhesive
Adhesive flash breaks Improper surface Check treating
easily away from treatment procedure; use clean
substrate solvents and wiping rags
Make sure cleaned parts
are not touched before
bonding
Adhesive flash is Excess air stirred into Vacuum-degas adhesive
excessively porous adhesive before application
Solvent not completely Increase drying time or
dried out before bonding temperature
Adhesive material Seek advice from
contains volatile manufacturers
constituent
Adhesive flash can be Adhesive not properly Use higher curing
softened by heating or cured temperature or extend
wiping with solvent curing time
Temperature and time
must be above minimum
specified. Check mixing
5.3.2.2 Tap test. One of the first non-destructive methods used to
evaluate the quality of an adhesive joint was by tapping the bonded
joint and assessing the resulting tone. Tone differences indicate incon-
sistencies in the bonded joint. This could be due to insufficient cure,
voids, or other problems. Simple tapping of a bonded joint with a coin
or light hammer can indicate an unbonded area. Sharp clear tones
indicate that adhesive is present and adhering to the substrate in
some degree; dull hollow tones indicate a void or unattached area.
The success of the tap test depends on the skill and experience of
the operator, the background noise level, and the type of structure.