
Page 176 - Injection Molding Advanced Troubleshooting Guide
P. 176
166 18 Bubbles
18.2 Bubbles Troubleshooting Chart
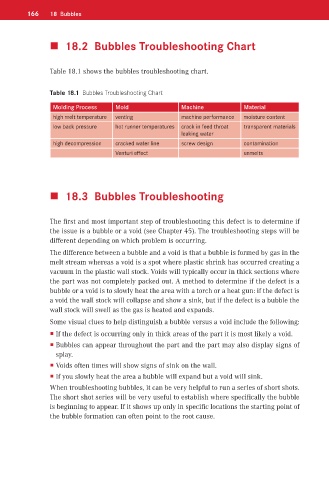
Table 18.1 shows the bubbles troubleshooting chart.
Table 18.1 Bubbles Troubleshooting Chart
Molding Process Mold Machine Material
high melt temperature venting machine performance moisture content
low back pressure hot runner temperatures crack in feed throat transparent materials
leaking water
high decompression cracked water line screw design contamination
Venturi effect unmelts
18.3 Bubbles Troubleshooting
The first and most important step of troubleshooting this defect is to determine if
the issue is a bubble or a void (see Chapter 45). The troubleshooting steps will be
different depending on which problem is occurring.
The difference between a bubble and a void is that a bubble is formed by gas in the
melt stream whereas a void is a spot where plastic shrink has occurred creating a
vacuum in the plastic wall stock. Voids will typically occur in thick sections where
the part was not completely packed out. A method to determine if the defect is a
bubble or a void is to slowly heat the area with a torch or a heat gun: if the defect is
a void the wall stock will collapse and show a sink, but if the defect is a bubble the
wall stock will swell as the gas is heated and expands.
Some visual clues to help distinguish a bubble versus a void include the following:
If the defect is occurring only in thick areas of the part it is most likely a void.
Bubbles can appear throughout the part and the part may also display signs of
splay.
Voids often times will show signs of sink on the wall.
If you slowly heat the area a bubble will expand but a void will sink.
When troubleshooting bubbles, it can be very helpful to run a series of short shots.
The short shot series will be very useful to establish where specifically the bubble
is beginning to appear. If it shows up only in specific locations the starting point of
the bubble formation can often point to the root cause.