
Page 195 - Mastering SolidWorks
P. 195
|
164 CHAPTER 5 Using VisUalization techniqUes
Removing Appearances
You can think of multiple appearances applied as overrides within the part as an old chair with
many layers of paint. In this case, you can remove those layers of paint one by one until you get
down to the base material, which in this case is the default material: white plastic.
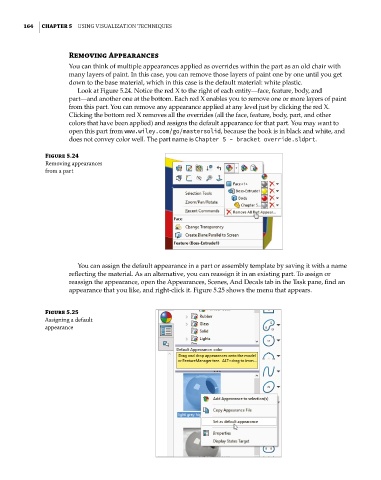
Look at Figure 5.24. Notice the red X to the right of each entity—face, feature, body, and
part—and another one at the bottom. Each red X enables you to remove one or more layers of paint
from this part. You can remove any appearance applied at any level just by clicking the red X.
Clicking the bottom red X removes all the overrides (all the face, feature, body, part, and other
colors that have been applied) and assigns the default appearance for that part. You may want to
open this part from www.wiley.com/go/mastersolid, because the book is in black and white, and
does not convey color well. The part name is Chapter 5 – bracket override.sldprt.
Figure 5.24
Removing appearances
from a part
You can assign the default appearance in a part or assembly template by saving it with a name
reflecting the material. As an alternative, you can reassign it in an existing part. To assign or
reassign the appearance, open the Appearances, Scenes, And Decals tab in the Task pane, find an
appearance that you like, and right-click it. Figure 5.25 shows the menu that appears.
Figure 5.25
assigning a default
appearance