Page 321 - Materials Science and Engineering An Introduction
P. 321
Questions and Problems  •  293

                 (c)  Determine a ductile-to-brittle transition tem-  load cycling along its axis. Compute the maximum
                 perature as the temperature at which the impact   and minimum loads that will be applied to yield a
                                                                                   6
                 energy is 20 J.                                fatigue life of 1.0   10  cycles. Assume that data
              8.15  What is the maximum carbon content possible  in Figure 8.20 were taken for repeated axial ten-
                 for a plain carbon steel that must have an impact   sion–compression tests, that stress plotted on the
                 energy of at least 200 J at  50 C?             vertical axis is stress amplitude, and data were
                                                                taken for a mean stress of 50 MPa.
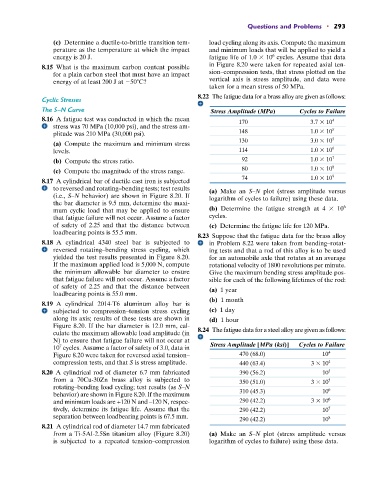
                                                            8.22  The fatigue data for a brass alloy are given as follows:
              Cyclic Stresses
              The S–N Curve                                     Stress Amplitude (MPa)     Cycles to Failure
              8.16  A fatigue test was conducted in which the mean       170                  3.7   10 4
                 stress was 70 MPa (10,000 psi), and the stress am-                                  5
                 plitude was 210 MPa (30,000 psi).                       148                  1.0   10 5
                 (a)  Compute the maximum and minimum stress             130                  3.0   10
                 levels.                                                 114                  1.0   10 6
                 (b)  Compute the stress ratio.                           92                  1.0   10 7
                 (c)  Compute the magnitude of the stress range.          80                  1.0   10 8
              8.17  A cylindrical bar of ductile cast iron is subjected   74                  1.0   10 9
                 to reversed and rotating–bending tests; test results   (a)  Make an S–N  plot (stress amplitude versus
                 (i.e., S–N  behavior) are shown in Figure 8.20. If  logarithm of cycles to failure) using these data.
                 the bar diameter is 9.5 mm, determine the maxi-
                                                                                                        6
                 mum cyclic load that may be applied to ensure  (b)  Determine the fatigue strength at 4    10
                 that fatigue failure will not occur. Assume a factor   cycles.
                 of safety of 2.25 and that the distance between  (c)  Determine the fatigue life for 120 MPa.
                 loadbearing points is 55.5 mm.
                                                            8.23  Suppose that the fatigue data for the brass alloy
              8.18  A cylindrical 4340 steel bar is subjected to  in Problem 8.22 were taken from bending–rotat-
                 reversed rotating–bending stress cycling, which  ing tests and that a rod of this alloy is to be used
                 yielded the test results presented in Figure 8.20.  for an automobile axle that rotates at an average
                 If the maximum applied load is 5,000 N, compute   rotational velocity of 1800 revolutions per minute.
                 the minimum allowable bar diameter to ensure   Give the maximum bending stress amplitude pos-
                 that fatigue failure will not occur. Assume a factor   sible for each of the following lifetimes of the rod:
                 of safety of 2.25 and that the distance between   1 year
                 loadbearing points is 55.0 mm.                 (a)
                                                                (b)  1 month
              8.19  A cylindrical 2014-T6 aluminum alloy bar is
                 subjected to compression–tension stress cycling  (c)  1 day
                 along its axis; results of these tests are shown in  (d)  1 hour
                 Figure 8.20. If the bar diameter is 12.0 mm, cal-
                 culate the maximum allowable load amplitude (in   8.24  The fatigue data for a steel alloy are given as follows:
                 N) to ensure that fatigue failure will not occur at
                   7
                 10  cycles. Assume a factor of safety of 3.0, data in   Stress Amplitude [MPa (ksi)]   Cycles to Failure
                 Figure 8.20 were taken for reversed axial tension–      470 (68.0)               10 4
                 compression tests, and that S is stress amplitude.      440 (63.4)           3   10 4
              8.20  A cylindrical rod of diameter 6.7 mm fabricated      390 (56.2)               10 5
                 from a 70Cu-30Zn brass alloy is subjected to            350 (51.0)           3   10 5
                 rotating–bending load cycling; test results (as S–N                                6
                 behavior) are shown in Figure 8.20. If the maximum      310 (45.3)               10
                 and minimum loads are +120 N and –120 N, respec-        290 (42.2)           3   10 6
                 tively, determine its fatigue life. Assume that the     290 (42.2)               10 7
                 separation between loadbearing points is 67.5 mm.       290 (42.2)               10 8
              8.21  A cylindrical rod of diameter 14.7 mm fabricated
                 from a Ti-5Al-2.5Sn titanium alloy (Figure 8.20)  (a)  Make an S–N  plot (stress amplitude versus
                 is subjected to a repeated tension–compression  logarithm of cycles to failure) using these data.

