Page 71 - Mechanics of Asphalt Microstructure and Micromechanics
P. 71
64   Ch a p t e r  Th r e e


                 Equation 3-3 represents that the point fraction, line fraction, area fraction, and vol-
              ume fraction are equal to one another. This concept is now understood by laymen when
              digital images enable people to directly talk about the length, area, and volume of im-
              ages in pixels and voxels. A pixel represents a point, a length, and an area in 2D space.
              A voxel represents a point with volume in 3D space.

              3.2.2 Specific Surface Area
              A well-known relationship often used for estimating the specific surface area (Equation
              3-4) of a phase is presented in Equation 3-5.
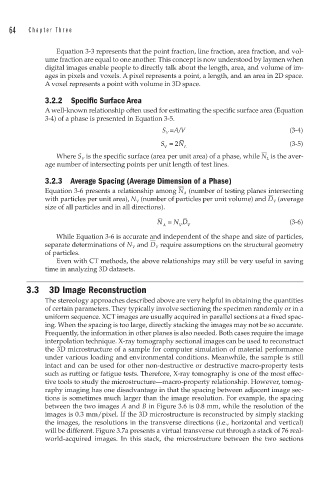
                                              S V =A/V                            (3-4)

                                              S = 2 N L                           (3-5)
                                               V
                                                                          —
                 Where S V  is the specific surface (area per unit area) of a phase, while N L  is the aver-
              age number of intersecting points per unit length of test lines.
              3.2.3  Average Spacing (Average Dimension of a Phase)
                                                   —
              Equation 3-6 presents a relationship among N A  (number of testing planes intersecting
                                                                            —
              with particles per unit area), N V  (number of particles per unit volume) and D V  (average
              size of all particles and in all directions).
                                             N =  N D                             (3-6)
                                               A   V  V
                 While Equation 3-6 is accurate and independent of the shape and size of particles,
                                           —
              separate determinations of N V  and D V  require assumptions on the structural geometry
              of particles.
                 Even with CT methods, the above relationships may still be very useful in saving
              time in analyzing 3D datasets.

        3.3  3D Image Reconstruction
              The stereology approaches described above are very helpful in obtaining the quantities
              of certain parameters. They typically involve sectioning the specimen randomly or in a
              uniform sequence. XCT images are usually acquired in parallel sections at a fixed spac-
              ing. When the spacing is too large, directly stacking the images may not be so accurate.
              Frequently, the information in other planes is also needed. Both cases require the image
              interpolation technique. X-ray tomography sectional images can be used to reconstruct
              the 3D microstructure of a sample for computer simulation of material performance
              under various loading and environmental conditions. Meanwhile, the sample is still
              intact and can be used for other non-destructive or destructive macro-property tests
              such as rutting or fatigue tests. Therefore, X-ray tomography is one of the most effec-
              tive tools to study the microstructure—macro-property relationship. However, tomog-
              raphy imaging has one disadvantage in that the spacing between adjacent image sec-
              tions is sometimes much larger than the image resolution. For example, the spacing
              between the two images A and B in Figure 3.6 is 0.8 mm, while the resolution of the
              images is 0.3 mm/pixel. If the 3D microstructure is reconstructed by simply stacking
              the images, the resolutions in the transverse directions (i.e., horizontal and vertical)
              will be different. Figure 3.7a presents a virtual transverse cut through a stack of 76 real-
              world-acquired images. In this stack, the microstructure between the two sections

