
Page 224 - Practical Machinery Management for Process Plants Major Process Equipment Maintenance and Repair
P. 224
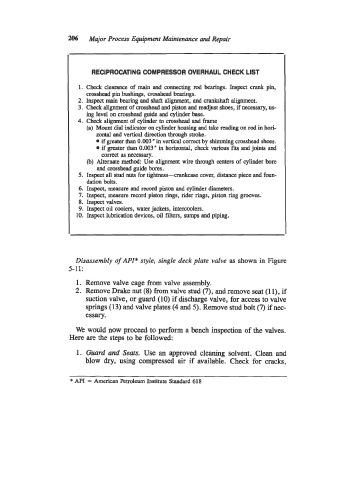
206   Major Process Equipment Maintenance and Repair


                            RECIPROCATING COMPRESSOR OVERHAUL CHECK LIST

                        1.  Check clearance of  main  and connecting rod bearings.  Inspect crank pin,
                           crosshead pin bushings, crosshead bearings.
                        2. Inspect main bearing and shaft alignment, and crankshaft alignment.
                        3.  Check alignment of crosshead and piston and readjust shoes, if necessary, us-
                           ing level on crosshead guide and cylinder base.
                        4.  Check alignment of cylinder to crosshead and frame
                           (a)  Mount dial indicator on cylinder housing and take reading on rod in hori-
                              zontal and vertical direction through stroke.
                               if greater than 0.003" in vertical correct by shimming crosshead shoes.
                               if greater than 0.003" in horizontal, check various fits and joints and
                               correct as necessary.
                           (b)  Alternate method:  Use alignment wire through centers of cylinder bore
                              and crosshead guide bores.
                        5.  Inspect all stud nuts for tightness-crankcase  cover, distance piece and foun-
                           dation bolts.
                        6.  Inspect, measure and record piston and cylinder diameters.
                        7.  Inspect, measure record piston rings, rider rings, piston ring grooves.
                        8.  Inspectvalves.
                        9.  Inspect oil coolers, water jackets, intercoolers.
                        10.  Inspect lubrication devices, oil filters, sumps and piping.


                        Disassembly of APZ*  style, single deck plate  valve  as shown in Figure
                     5-11:

                        1.  Remove valve cage from valve assembly.
                        2.  Remove Drake nut (8) from valve stud (7), and remove seat (1 l), if
                           suction valve, or guard (10) if discharge valve, for access to valve
                           springs (13) and valve plates (4 and 5). Remove stud bolt (7) if nec-
                           essary.
                        We  would now proceed to perform a bench inspection of the valves.
                      Here are the steps to be followed:
                        1.  Guard and  Sears.  Use an approved cleaning  solvent. Clean and
                           blow  dry, using  compressed  air  if  available.  Check  for  cracks,


                      * API  = American Petroleum Institute Standard 618