
Page 302 - Robot Builder's Bonanza
P. 302
MOUNTING R/C SERVOS 271
Making Your Own Servo Mounts
You can also construct your own servo mounting brackets using 1/8″-thick aluminum or plas-
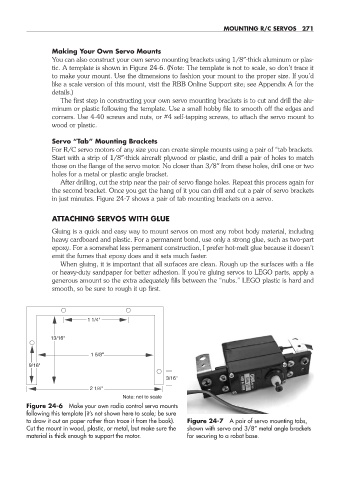
tic. A template is shown in Figure 24- 6. (Note: The template is not to scale, so don’t trace it
to make your mount. Use the dimensions to fashion your mount to the proper size. If you’d
like a scale version of this mount, visit the RBB Online Support site; see Appendix A for the
details.)
The first step in constructing your own servo mounting brackets is to cut and drill the alu-
minum or plastic following the template. Use a small hobby file to smooth off the edges and
corners. Use 4- 40 screws and nuts, or #4 self- tapping screws, to attach the servo mount to
wood or plastic.
Servo “Tab” Mounting Brackets
For R/C servo motors of any size you can create simple mounts using a pair of “tab brackets.
Start with a strip of 1/8″-thick aircraft plywood or plastic, and drill a pair of holes to match
those on the flange of the servo motor. No closer than 3/8″ from these holes, drill one or two
holes for a metal or plastic angle bracket.
After drilling, cut the strip near the pair of servo flange holes. Repeat this process again for
the second bracket. Once you get the hang of it you can drill and cut a pair of servo brackets
in just minutes. Figure 24- 7 shows a pair of tab mounting brackets on a servo.
ATTACHING SERVOS WITH GLUE
Gluing is a quick and easy way to mount servos on most any robot body material, including
heavy cardboard and plastic. For a permanent bond, use only a strong glue, such as two- part
epoxy. For a somewhat less permanent construction, I prefer hot- melt glue because it doesn’t
emit the fumes that epoxy does and it sets much faster.
When gluing, it is important that all surfaces are clean. Rough up the surfaces with a file
or heavy- duty sandpaper for better adhesion. If you’re gluing servos to LEGO parts, apply a
generous amount so the extra adequately fills between the “nubs.” LEGO plastic is hard and
smooth, so be sure to rough it up first.
1 1/4"
13/16"
1 5/8"
9/16"
3/16"
2 1/4"
Note: not to scale
Figure 24- 6 Make your own radio control servo mounts
following this template (it’s not shown here to scale; be sure
to draw it out on paper rather than trace it from the book). Figure 24- 7 A pair of servo mounting tabs,
Cut the mount in wood, plastic, or metal, but make sure the shown with servo and 3/8″ metal angle brackets
material is thick enough to support the motor. for securing to a robot base.
24-chapter-24.indd 271 4/21/11 11:51 AM