
Page 405 - Robot Builder's Bonanza
P. 405
374 BUILDING ROBOT ELECTRONICS— THE BASICS
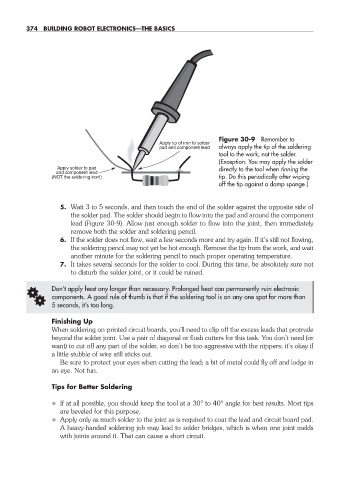
Figure 30- 9 Remember to
Apply tip of iron to solder
pad and component lead always apply the tip of the soldering
tool to the work, not the solder.
(Exception: You may apply the solder
Apply solder to pad directly to the tool when tinning the
and component lead
(NOT the soldering iron!) tip. Do this periodically after wiping
off the tip against a damp sponge.)
5. Wait 3 to 5 seconds, and then touch the end of the solder against the opposite side of
the solder pad. The solder should begin to flow into the pad and around the component
lead (Figure 30- 9). Allow just enough solder to flow into the joint, then immediately
remove both the solder and soldering pencil.
6. If the solder does not flow, wait a few seconds more and try again. If it’s still not flowing,
the soldering pencil may not yet be hot enough. Remove the tip from the work, and wait
another minute for the soldering pencil to reach proper operating temperature.
7. It takes several seconds for the solder to cool. During this time, be absolutely sure not
to disturb the solder joint, or it could be ruined.
G Don’t apply heat any longer than necessary. Prolonged heat can permanently ruin electronic
components. A good rule of thumb is that if the soldering tool is on any one spot for more than
5 seconds, it’s too long.
Finishing Up
When soldering on printed circuit boards, you’ll need to clip off the excess leads that protrude
beyond the solder joint. Use a pair of diagonal or flush cutters for this task. You don’t need (or
want) to cut off any part of the solder, so don’t be too aggressive with the nippers; it’s okay if
a little stubble of wire still sticks out.
Be sure to protect your eyes when cutting the lead; a bit of metal could fly off and lodge in
an eye. Not fun.
Tips for Better Soldering
• If at all possible, you should keep the tool at a 30° to 40° angle for best results. Most tips
are beveled for this purpose.
• Apply only as much solder to the joint as is required to coat the lead and circuit board pad.
A heavy- handed soldering job may lead to solder bridges, which is when one joint melds
with joints around it. That can cause a short circuit.
30-chapter-30.indd 374 4/21/11 11:55 AM