
Page 407 - Robot Builder's Bonanza
P. 407
376 BUILDING ROBOT ELECTRONICS— THE BASICS
Wires
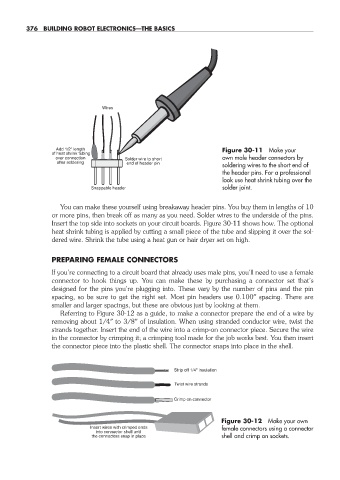
Add 1/2" length Figure 30- 11 Make your
of heat shrink tubing
over connection Solder wire to short own male header connectors by
after soldering end of header pin
soldering wires to the short end of
the header pins. For a professional
look use heat shrink tubing over the
Snappable header solder joint.
You can make these yourself using breakaway header pins. You buy them in lengths of 10
or more pins, then break off as many as you need. Solder wires to the underside of the pins.
Insert the top side into sockets on your circuit boards. Figure 30- 11 shows how. The optional
heat shrink tubing is applied by cutting a small piece of the tube and slipping it over the sol-
dered wire. Shrink the tube using a heat gun or hair dryer set on high.
PREPARING FEMALE CONNECTORS
If you’re connecting to a circuit board that already uses male pins, you’ll need to use a female
connector to hook things up. You can make these by purchasing a connector set that’s
designed for the pins you’re plugging into. These vary by the number of pins and the pin
spacing, so be sure to get the right set. Most pin headers use 0.100″ spacing. There are
smaller and larger spacings, but these are obvious just by looking at them.
Referring to Figure 30- 12 as a guide, to make a connector prepare the end of a wire by
removing about 1/4″ to 3/8″ of insulation. When using stranded conductor wire, twist the
strands together. Insert the end of the wire into a crimp- on connector piece. Secure the wire
in the connector by crimping it; a crimping tool made for the job works best. You then insert
the connector piece into the plastic shell. The connector snaps into place in the shell.
Strip off 1/4" insulation
Twist wire strands
Crimp on connector
Figure 30- 12 Make your own
Insert wires with crimped ends female connectors using a connector
into connector shell until
the connectors snap in place shell and crimp on sockets.
30-chapter-30.indd 376 4/21/11 11:55 AM