
Page 287 - Robots Androids and Animatrons : 12 Incredible Projects You Can Build
P. 287
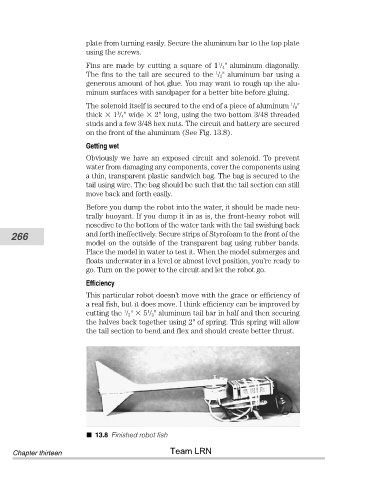
plate from turning easily. Secure the aluminum bar to the top plate
                                using the screws.
                                Fins are made by cutting a square of 1 / 4" aluminum diagonally.
                                                                     1
                                                                    1
                                The fins to the tail are secured to the  / 2" aluminum bar using a
                                generous amount of hot glue. You may want to rough up the alu-
                                minum surfaces with sandpaper for a better bite before gluing.
                                                                                         1
                                The solenoid itself is secured to the end of a piece of aluminum  / 8"
                                         1
                                thick   1 / 4" wide   2" long, using the two bottom 3/48 threaded
                                studs and a few 3/48 hex nuts. The circuit and battery are secured
                                on the front of the aluminum (See Fig. 13.8).
                                Getting wet
                                Obviously we have an exposed circuit and solenoid. To prevent
                                water from damaging any components, cover the components using
                                a thin, transparent plastic sandwich bag. The bag is secured to the
                                tail using wire. The bag should be such that the tail section can still
                                move back and forth easily.
                                Before you dump the robot into the water, it should be made neu-
                                trally buoyant. If you dump it in as is, the front-heavy robot will
                                nosedive to the bottom of the water tank with the tail swishing back
           266                  and forth ineffectively. Secure strips of Styrofoam to the front of the
                                model on the outside of the transparent bag using rubber bands.
                                Place the model in water to test it. When the model submerges and
                                floats underwater in a level or almost level position, you’re ready to
                                go. Turn on the power to the circuit and let the robot go.
                                Efficiency

                                This particular robot doesn’t move with the grace or efficiency of
                                a real fish, but it does move. I think efficiency can be improved by
                                           1
                                cutting the  / 2"   5 / 2" aluminum tail bar in half and then securing
                                                 1
                                the halves back together using 2" of spring. This spring will allow
                                the tail section to bend and flex and should create better thrust.


                                  13.8 Finished robot fish
                                                       Team LRN
            Chapter thirteen