Page 277 - The Jet Engine
P. 277
Overhaul


                      matt finish which reveals surface defects that cannot  fluorescent test. With the dye test, a penetrating
                      normally be seen with the naked eye.  The metal  coloured dye is induced to enter any cracks or pores
                      removal is normally achieved either by an electrolyt-  in the surface of the part. The surface is then washed
                      ic process in which the part forms the anode, or by  and a developer fluid containing white absorbents is
                      immersing the part for a short time in a special acid  applied. Dye remaining in cracks or other surface
                      bath. Both methods must be carefully controlled to  defects is drawn to the surface of the developer by
                      avoid the removal of too much material.          capillary action and the resultant stains indicate their
                                                                       locations.
                      22. After the components have been cleaned they
                      are visually and, when necessary, dimensionally  27. Fluorescent testing is based on the principle
                      inspected to establish general condition and then  that when ultra-violet radiation falls on a chemical
                      subjected to crack inspection.  This may include  compound, known as fluorescent ink, it is absorbed
                      binocular and magnetic or penetrant inspection   and its energy re-emitted as visible light. If a suitable
                      techniques, used either alone or consecutively,  ink is allowed to penetrate surface cavities, the
                      depending on the components being inspected and  places where it is trapped will be revealed under the
                      the degree of inspection considered necessary.   rays of an ultra-violet lamp by brilliant light
                                                                       emissions.
                      23. The non-dimensional inspections can be
                      divided into visual examination for general condition  28. Magnetic crack testing (fig. 25-3) can only be
                      and inspection for cracks.  The visual examination  applied to components which can be magnetized.
                      depends on the inspector's judgement, based on   The part is first magnetized and then sprayed with, or
                      experience and backed by guidance from the manu-  immersed in, a low viscosity fluid which contains
                      facturer.  Although the visual examination of many  ferrous particles and is known as 'ink'. The two walls
                      parts of the engine conform to normal engineering  of a crack in the magnetized part form magnetic
                      practice, for some parts the acceptance standards  poles and the magnetic field between these poles
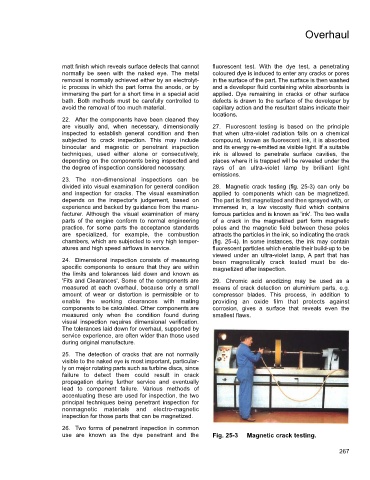
                      are specialized, for example, the combustion     attracts the particles in the ink, so indicating the crack
                      chambers, which are subjected to very high temper-  (fig. 25-4). In some instances, the ink may contain
                      atures and high speed airflows in service.       fluorescent particles which enable their build-up to be
                                                                       viewed under an ultra-violet lamp,  A part that has
                      24. Dimensional inspection consists of measuring  been magnetically crack tested must be de-
                      specific components to ensure that they are within  magnetized after inspection.
                      the limits and tolerances laid down and known as
                      'Fits and Clearances'. Some of the components are  29. Chromic acid anodizing may be used as a
                      measured at each overhaul, because only a small  means of crack detection on aluminium parts, e.g.
                      amount of wear or distortion is permissible or to  compressor blades.  This process, in addition to
                      enable the working clearances with mating        providing an oxide film that protects against
                      components to be calculated. Other components are  corrosion, gives a surface that reveals even the
                      measured only when the condition found during    smallest flaws.
                      visual inspection requires dimensional verification.
                      The tolerances laid down for overhaul, supported by
                      service experience, are often wider than those used
                      during original manufacture.
                      25. The detection of cracks that are not normally
                      visible to the naked eye is most important, particular-
                      ly on major rotating parts such as turbine discs, since
                      failure to detect them could result in crack
                      propagation during further service and eventually
                      lead to component failure. Various methods of
                      accentuating these are used for inspection, the two
                      principal techniques being penetrant inspection for
                      nonmagnetic materials and electro-magnetic
                      inspection for those parts that can be magnetized.

                      26. Two forms of penetrant inspection in common
                      use are known as the dye penetrant and the       Fig. 25-3   Magnetic crack testing.

                                                                                                                 267

