
Page 126 - 15 Dangerously Mad Projects for the Evil Genius
P. 126
Chapter 8 ■ Persistence-of-Vision Display 105
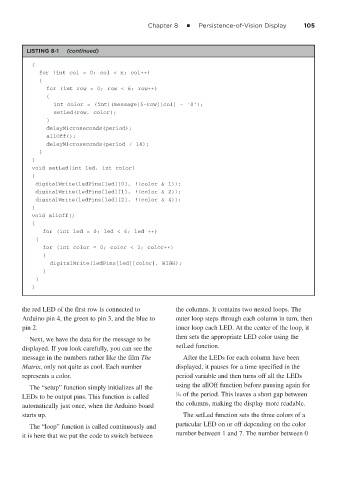
LISTING 8-1 (continued)
{
for (int col = 0; col < n; col++)
{
for (int row = 0; row < 6; row++)
{
int color = (int)(message[5-row][col] - '0');
setLed(row, color);
}
delayMicroseconds(period);
allOff();
delayMicroseconds(period / 16);
}
}
void setLed(int led, int color)
{
digitalWrite(ledPins[led][0], !(color & 1));
digitalWrite(ledPins[led][1], !(color & 2));
digitalWrite(ledPins[led][2], !(color & 4));
}
void allOff()
{
for (int led = 0; led < 6; led ++)
{
for (int color = 0; color < 3; color++)
{
digitalWrite(ledPins[led][color], HIGH);
}
}
}
the red LED of the first row is connected to the columns. It contains two nested loops. The
Arduino pin 4, the green to pin 3, and the blue to outer loop steps through each column in turn, then
pin 2. inner loop each LED. At the center of the loop, it
Next, we have the data for the message to be then sets the appropriate LED color using the
displayed. If you look carefully, you can see the setLed function.
message in the numbers rather like the film The After the LEDs for each column have been
Matrix, only not quite as cool. Each number displayed, it pauses for a time specified in the
represents a color. period variable and then turns off all the LEDs
The “setup” function simply initializes all the using the allOff function before pausing again for
1 ⁄16 of the period. This leaves a short gap between
LEDs to be output pins. This function is called
the columns, making the display more readable.
automatically just once, when the Arduino board
starts up. The setLed function sets the three colors of a
particular LED on or off depending on the color
The “loop” function is called continuously and
number between 1 and 7. The number between 0
it is here that we put the code to switch between