
Page 193 - 15 Dangerously Mad Projects for the Evil Genius
P. 193
170 15 Dangerously Mad Projects for the Evil Genius
and LED to the top hole, or move the electromagnet to the electromagnet is increased, and as it rises
downward by screwing it further out of the wood. above that point, the power is decreased.
If on the other hand the object always just flies However, using only this approach, the object
straight up to the magnet and attaches itself to the will just bounce up and down, becoming more and
metal bolt, you need to move the electromagnet more unstable. You can try this by changing the
and permanent magnet further apart. value of B to 0 using the Serial Monitor in the way
Once you have the basic spacing about right, we described earlier. To achieve any kind of
you may find that the bottle jumps about, rather stability, we must take the velocity of the object
than remaining in a stable position. If this is the into account. If the velocity indicates that the
case, you need to adjust parameters A, B, C, and D object is above the desired position but is traveling
downwards quickly, we need to ease off the power
in the program. It is most likely to be B that needs
early, or the object will overshoot the target.
adjusting, and fortunately you can alter this
without having to change the program. Open the The formula for calculating the power is:
Serial Monitor again as if you were monitoring the
Power Position / A B Velocity C
position and velocity readings, but instead of
The purpose of A is to scale down the value of
entering the m command, you have two other
the position from its maximum value of about 600
commands. Entering a B and pressing ENTER will
to the maximum value of around 255 needed to
increase the value of B, and entering a lowercase b
output to the coil. So in this case, halving it is
will decrease it. While holding onto the bottle,
about right. If the value for the position in your
change the value of B until maximum stability is
arrangement is say 900 rather than 600, you should
achieved.
increase A to 3. Note that A is an integer value, so
Note that if you use the m option to turn on you cannot change it to 1.5.
monitoring, this slows everything down, and the
levitation will not work. So you cannot use the
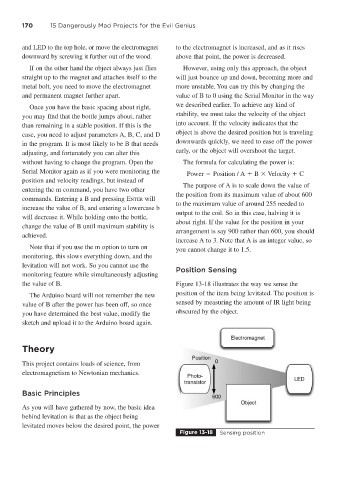
Position Sensing
monitoring feature while simultaneously adjusting
the value of B. Figure 13-18 illustrates the way we sense the
The Arduino board will not remember the new position of the item being levitated. The position is
value of B after the power has been off, so once sensed by measuring the amount of IR light being
you have determined the best value, modify the obscured by the object.
sketch and upload it to the Arduino board again.
Theory
This project contains loads of science, from
electromagnetism to Newtonian mechanics.
Basic Principles
As you will have gathered by now, the basic idea
behind levitation is that as the object being
levitated moves below the desired point, the power
Figure 13-18 Sensing position