
Page 282 - Advances in Biomechanics and Tissue Regeneration
P. 282
280 14. USING 3-D PRINTING AND BIOPRINTING TECHNOLOGIES FOR PERSONALIZED IMPLANTS
number of implant size. For a personalized injection molded implant, a new mold needs to be designed and produced
for each implant, which is due to the current costs related to mold design and production, not economically feasible.
The last aspect is the time efficiency of 3-D printing. With this technique, a personalized implant can be printed in
less than few hours that is faster than any other manufacturing techniques, due to the decreasing number of steps from
the medical imaging to implant production. Although for standard implants the impact of this fact is less evident for
certain implantations, the implants need to be implanted in a short time (few days), and so with injection molding
technique, it will not be possible to produce a personalized implant in such a short notice since the production of a
new mold can take more than a month [75, 76].
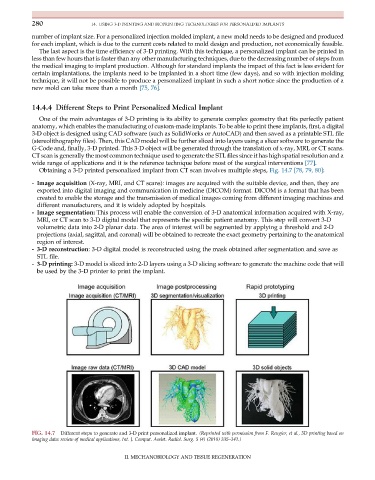
14.4.4 Different Steps to Print Personalized Medical Implant
One of the main advantages of 3-D printing is its ability to generate complex geometry that fits perfectly patient
anatomy, which enables the manufacturing of custom-made implants. To be able to print these implants, first, a digital
3-D object is designed using CAD software (such as SolidWorks or AutoCAD) and then saved as a printable STL file
(stereolithography files). Then, this CAD model will be further sliced into layers using a slicer software to generate the
G-Code and, finally, 3-D printed. This 3-D object will be generated through the translation of x-ray, MRI, or CT scans.
CT scan is generally the most common technique used to generate the STL files since it has high spatial resolution and a
wide range of applications and it is the reference technique before most of the surgical interventions [77].
Obtaining a 3-D printed personalized implant from CT scan involves multiple steps, Fig. 14.7 [78, 79, 80]:
- Image acquisition (X-ray, MRI, and CT scans): images are acquired with the suitable device, and then, they are
exported into digital imaging and communication in medicine (DICOM) format. DICOM is a format that has been
created to enable the storage and the transmission of medical images coming from different imaging machines and
different manufacturers, and it is widely adopted by hospitals.
- Image segmentation: This process will enable the conversion of 3-D anatomical information acquired with X-ray,
MRI, or CT scan to 3-D digital model that represents the specific patient anatomy. This step will convert 3-D
volumetric data into 2-D planar data. The area of interest will be segmented by applying a threshold and 2-D
projections (axial, sagittal, and coronal) will be obtained to recreate the exact geometry pertaining to the anatomical
region of interest.
- 3-D reconstruction: 3-D digital model is reconstructed using the mask obtained after segmentation and save as
STL file.
- 3-D printing: 3-D model is sliced into 2-D layers using a 3-D slicing software to generate the machine code that will
be used by the 3-D printer to print the implant.
FIG. 14.7 Different steps to generate and 3-D print personalized implant. (Reprinted with permission from F. Rengier, et al., 3D printing based on
imaging data: review of medical applications, Int. J. Comput. Assist. Radiol. Surg. 5 (4) (2010) 335–341.)
II. MECHANOBIOLOGY AND TISSUE REGENERATION