Page 209 - 02. Subyek Computer Aided Design - Beginner’s Guide to SOLIDWORKS 2019- Level 1 by Alejandro Reyes
P. 209

Beginner's Guide to SOLIDWORKS 2019- Level I


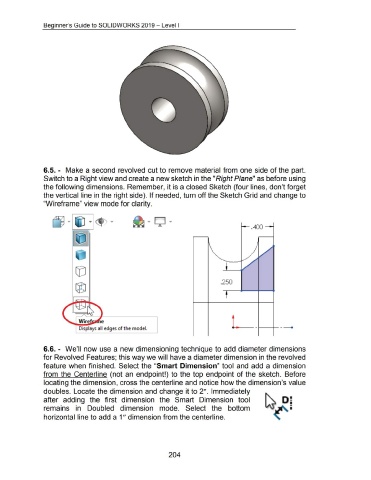
                                    6.5. - Make a second  revolved  cut to remove material from one side of the part.


                                    Switch to a Right view and create a new sketch in the "Right Plane" as before using


                                    the following dimensions. Remember, it is a closed Sketch (four lines, don't forget


                                    the vertical line in the right side). If needed, turn off the Sketch Grid and change to


                                    "Wireframe" view mode for clarity.


                                                                                                                                                                                                    .,_ . 400 ---.1


                                                                                                                                                                                   .250


                                                                                                                                                                                       t


                                                                 Wire              e


                                                                 Displays all edges of the model.


                                    6.6. - We'll  now use a new dimensioning technique to add diameter dimensions


                                    for Revolved Features; this way we will have a diameter dimension in the revolved


                                    feature when finished.  Select the "Smart Dimension" tool  and  add  a dimension


                                    from  the  Centerline  (not an  endpoint!) to  the top  endpoint of the sketch.  Before


                                    locating the dimension, cross the centerline and notice how the dimension's value


                                    doubles. Locate the dimension and change it to 2".  Immediately


                                    after  adding  the  first  dimension  the  Smart  Dimension  tool                                                                                                                                      •
                                                                                                                                                                                                                                           •
                                                                                                                                                                                                                                           I
                                                                                                                                                                                                                                           •
                                    remains  in  Doubled  dimension  mode.  Select  the  bottom                                                                                                                                            I


                                    horizontal line to add a 1" dimension from the centerline.


                                                                                                                                         204
   204   205   206   207   208   209   210   211   212   213   214