
Page 645 - 02. Subyek Computer Aided Design - Beginner’s Guide to SOLIDWORKS 2019- Level 1 by Alejandro Reyes
P. 645
Animation and Rendering
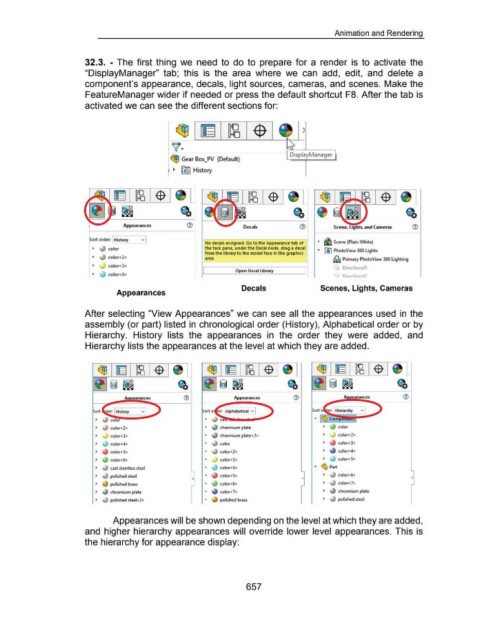
32.3. - The first thing we need to do to prepare for a render is to activate the
"DisplayManager" tab; this is the area where we can add, edit, and delete a
component's appearance, decals, light sources, cameras, and scenes. Make the
FeatureManager wider if needed or press the default shortcut F8. After the tab is
activated we can see the different sections for:
~ )
~· 1
DisplayManager
c!$ Gear Box_PV (Default)
~ ~ History
Appearances Decals Scene, L.ghts, and Cameras
rt order: History v
No decals assigned. Go to the Appearance tab of ~ ~ Scene (Plain White)
~ color the task pane, under the Decal node, d rag a decal • [0) PhotoView 360 Lights
from the library to the model face in the graphics
~ color<2> area ~ Primary PhotoView 360 Lighting
~ color<3>
""- Directiona11
[ Open Decal library
~ color<4> Os OirPrtinn;1l;>
Decals Scenes, Lights, Cameras
Appearances
After selecting "View Appearances" we can see all the appearances used in the
assembly (or part) listed in chronological order (History), Alphabetical order or by
Hierarchy. History lists the appearances in the order they were added, and
Hierarchy lists the appearances at the level at which they are added.
Appearances
Sort History ~ er: (Alphabetical v Sort
color<2> chromium plate
color<3> chromium plate<2> color<2>
color<4> color color<3>
color<5> color<2> color<4>
color<6> color<3> color<5>
cast stainless steel color<4> • ~ Part
polished steel color<5> color<6>
0
polished brass color<6> color<7>
chromium plate color<7> chromium plate
polished steel<2> polished brass polished steel
Appearances will be shown depending on the level at which they are added,
and higher hierarchy appearances will override lower level appearances. This is
the hierarchy for appearance display:
657