
Page 650 - 02. Subyek Computer Aided Design - Beginner’s Guide to SOLIDWORKS 2019- Level 1 by Alejandro Reyes
P. 650
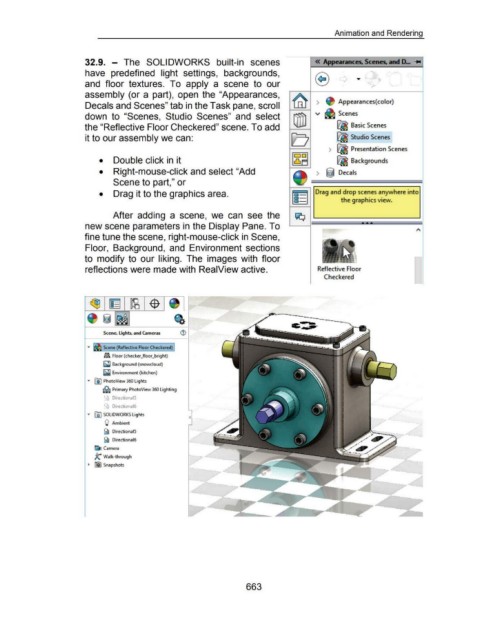
Animation and Rendering


                                                      32.9.  - The  SOLIDWORKS  built-in  scenes


                                                      have  predefined  light  settings,  backgrounds,


                                                      and  floor  textures.  To  apply  a  scene  to  our


                                                      assembly (or a  part),  open  the  "Appearances,

                                                                                                                                                                                                                     Appearances( color)
                                                      Decals and Scenes" tab in the Task pane, scroll


                                                      down  to  "Scenes,  Studio  Scenes"  and  select                                                                                                               Scenes


                                                      the "Reflective Floor Checkered" scene. To add                                                                                                                ~ Basic Scenes


                                                      it to our assembly we can:                                                                                                                                    ~ Studio Scenes


                                                                                                                                                                                                              •  ~ Presentation Scenes


                                                               •  Double click in it                                                                                                                                ~ Backgrounds


                                                               •  Right-mouse-click and select "Add                                                                                                    >  @ Decals


                                                                        Scene to part," or


                                                               •  Drag it to the graphics area.                                                                                                       Drag and drop scenes anywhere into

                                                                                                                                                                                                                      the graphics view.


                                                                        After  adding  a  scene,  we  can  see  the


                                                      new scene parameters in the Display Pane. To


                                                      fine tune the scene, right-mouse-click in Scene,


                                                      Floor,  Background, and  Environment sections


                                                      to  modify  to  our liking.  The  images  with  floor


                                                      reflections were made with ReaiView active.                                                                                                       Reflective Floor

                                                                                                                                                                                                            Checkered


                                                                                                                                                                                       c  -


                                                                 Scene, Lights, and Cameras                       ®


                                                       ...      . Scene (Reflective Floor Checkered)

                                                                  ~ Floor (checker_floor_bright)


                                                                  ~ Background (snowcloud)

                                                                  ~ Environment (kitchen)

                                                       ...  [j) PhotoView 360 Lights


                                                                 ~ Primary PhotoView 360 Lighting

                                                                   ,~  Directional5

                                                                  ""'"  Directional6


                                                       ...  @J SOLIDWORKS Lights

                                                                  \)  Ambient

                                                                  ~ Directional5

                                                                  ~ Directiona16

                                                            ~Camera


                                                            Jt Walk-through

                                                        ~  ftil Snapshots


                                                                                                                                                           663