
Page 653 - 02. Subyek Computer Aided Design - Beginner’s Guide to SOLIDWORKS 2019- Level 1 by Alejandro Reyes
P. 653
Beginner's Guide to SOLIDWORKS 2019- Level I
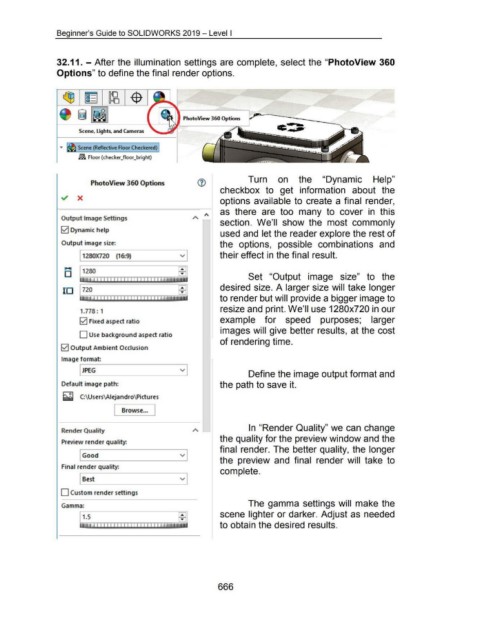
32.11. - After the illumination settings are complete, select the "PhotoView 360
Options" to define the final render options.
PhotoView 360 Options ,~-·--~===-----._
c.•-T
Scene, Lights, and Cameras
... Scene (Reflective Floor Checkered)
~ Floor (checker_floor_bright)
Turn on the "Dynamic Help"
PhotoView 360 Options
checkbox to get information about the
-./ X
options available to create a final render,
as there are too many to cover in this
Output Image Settings
section. We'll show the most commonly
0 Dynamic help
used and let the reader explore the rest of
Output image size: the options, possible combinations and
1280)(720 (16:9) v their effect in the final result.
.....
D 1280 Set "Output image size" to the
desired size. A larger size will take longer
10 720
to render but will provide a bigger image to
resize and print. We'll use 1280x720 in our
1.778 : 1
0 Fixed aspect ratio example for speed purposes; larger
images will give better results, at the cost
D Use background aspect ratio
of rendering time.
0 Output Ambient Occlusion
Image format:
JPEG v
Define the image output format and
Default image path: the path to save it.
t::Ol
_, C:\Users\Aiejandro\ Pictures
l Browse ... J
In "Render Quality" we can change
Render Quality
the quality for the preview window and the
Preview render quality:
final render. The better quality, the longer
Good v
the preview and final render will take to
Final render quality:
complete.
Best v
D Custom render settings
The gamma settings will make the
Gamma:
scene lighter or darker. Adjust as needed
to obtain the desired results.
666