
Page 81 - Build Your Own Quadcopter_ Power Up Your Designs with the Parallax Elev-8
P. 81
60 Bu il d Y o ur O w n Q u a d c o p t e r
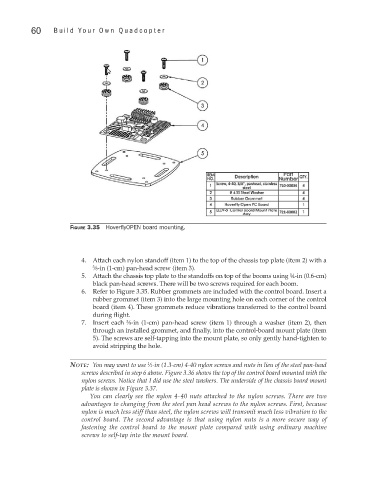
Figure 3.35 HoverflyOPEN board mounting.
4. Attach each nylon standoff (item 1) to the top of the chassis top plate (item 2) with a
3 ∕8-in (1-cm) pan-head screw (item 3).
5. Attach the chassis top plate to the standoffs on top of the booms using ¼-in (0.6-cm)
black pan-head screws. There will be two screws required for each boom.
6. Refer to Figure 3.35. Rubber grommets are included with the control board. Insert a
rubber grommet (item 3) into the large mounting hole on each corner of the control
board (item 4). These grommets reduce vibrations transferred to the control board
during flight.
3
7. Insert each ∕8-in (1-cm) pan-head screw (item 1) through a washer (item 2), then
through an installed grommet, and finally, into the control-board mount plate (item
5). The screws are self-tapping into the mount plate, so only gently hand-tighten to
avoid stripping the hole.
note: You may want to use ∕2-in (1.3-cm) 4-40 nylon screws and nuts in lieu of the steel pan-head
1
screws described in step 6 above. Figure 3.36 shows the top of the control board mounted with the
nylon screws. Notice that I did use the steel washers. The underside of the chassis board mount
plate is shown in Figure 3.37.
You can clearly see the nylon 4-40 nuts attached to the nylon screws. There are two
advantages to changing from the steel pan head screws to the nylon screws. First, because
nylon is much less stiff than steel, the nylon screws will transmit much less vibration to the
control board. The second advantage is that using nylon nuts is a more secure way of
fastening the control board to the mount plate compared with using ordinary machine
screws to self-tap into the mount board.