
Page 195 - Laboratory Manual in Physical Geology
P. 195
A CTIVIT Y 6.3 Clastic and Detrital Sediment
Name: ______________________________________ Course/Section: ______________________ Date: ___________
A. Obtain two pieces of granite or diorite. Hold one in each hand and tap them together over a piece of paper. As you do this
you should notice that you are breaking tiny sedimentary grains from the larger rock samples. These broken pieces of rocks
and minerals are called clasts (from the Greek klastós , meaning “broken in pieces”).
1. Using a hand lens or microscope, observe the tiny clasts that you just broke from the larger rock samples. Describe what
minerals make up the clasts and whether or not the clasts are fragments of mineral crystals, rock fragments, or a mixture
of both.
2. Geologists commonly refer to several different kinds of clastic sediment. Circle the one that you just made.
■ pyroclastic sediment —volcanic bombs and/or volcanic rocks fragmented by volcanic eruption
■ bioclastic sediment —broken pieces of shells, plants, and/or other parts of organisms
■ siliciclastic sediment —broken pieces of silicate mineral crystals and/or rocks containing them
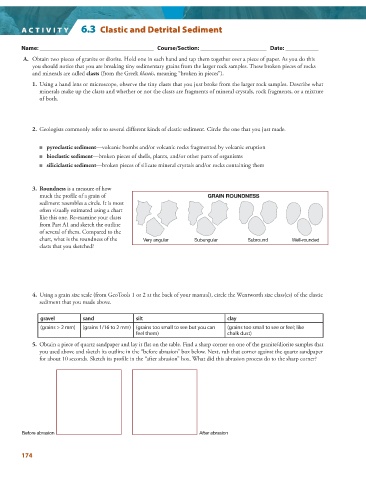
3. Roundness is a measure of how
much the profile of a grain of GRAIN ROUNDNESS
sediment resembles a circle. It is most
often visually estimated using a chart
like this one. Re-examine your clasts
from Part A1 and sketch the outline
of several of them. Compared to the
chart, what is the roundness of the Very angular Subangular Subround Well-rounded
clasts that you sketched?
4. Using a grain size scale (from GeoTools 1 or 2 at the back of your manual), circle the Wentworth size class(es) of the clastic
sediment that you made above.
gravel sand silt clay
(grains > 2 mm) (grains 1/16 to 2 mm) (grains too small to see but you can (grains too small to see or feel; like
feel them) chalk dust)
5. Obtain a piece of quartz sandpaper and lay it flat on the table. Find a sharp corner on one of the granite/diorite samples that
you used above and sketch its outline in the “before abrasion” box below. Next, rub that corner against the quartz sandpaper
for about 10 seconds. Sketch its profile in the “after abrasion” box. What did this abrasion process do to the sharp corner?
Before abrasion After abrasion
174