
Page 114 - Separation process engineering
P. 114
Go to the bottom menu and left-click Separators (flash drums). (If you can’t see a bottom menu, go to
VIEW and click on Model Library.) After clicking on Separators, left-click Flash2 (That is Flash drums
with two outlets). Drag your cursor to the center of the blank space and left-click. This gives the basic
module for a flash drum. You can deselect the Flash2 option (to avoid getting extra copies by accident)
by clicking on the arrow in the lower-left corner. This is the Cancel Insert Mode button—it is a good
idea to click it after completing each step of setting up the flowsheet.
Try left-clicking on the module (in the working space) to select it and right-clicking the mouse to see the
menu of possibilities. Rename the block by left-clicking Rename Block, “typing in a name such as
“FLASH” and clicking OK.
The basic flash drum needs to have a feed line and two outlets. Left-click on the icon labeled Material
Streams in the bottom menu to get possible ports (after you move the cursor into the white drawing
screen). Move cursor to one of the arrows until it lights up. Left-click (take your finger off the button)
and move cursor away from flash drum. Then left-click again to obtain a labeled material stream.
Additional streams can be obtained the same way. Put the feed, vapor product, and liquid product
streams on your flowsheet. After clicking the Cancel Insert Mode button, highlight the stream names by
clicking the left mouse button, and use the right button to obtain a menu. Rename the streams as desired.
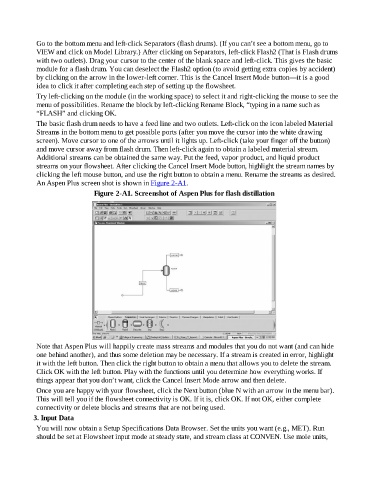
An Aspen Plus screen shot is shown in Figure 2-A1.
Figure 2-A1. Screenshot of Aspen Plus for flash distillation
Note that Aspen Plus will happily create mass streams and modules that you do not want (and can hide
one behind another), and thus some deletion may be necessary. If a stream is created in error, highlight
it with the left button. Then click the right button to obtain a menu that allows you to delete the stream.
Click OK with the left button. Play with the functions until you determine how everything works. If
things appear that you don’t want, click the Cancel Insert Mode arrow and then delete.
Once you are happy with your flowsheet, click the Next button (blue N with an arrow in the menu bar).
This will tell you if the flowsheet connectivity is OK. If it is, click OK. If not OK, either complete
connectivity or delete blocks and streams that are not being used.
3. Input Data
You will now obtain a Setup Specifications Data Browser. Set the units you want (e.g., MET). Run
should be set at Flowsheet input mode at steady state, and stream class at CONVEN. Use mole units,