
Page 314 - The Creative Training Idea Book Inspired Tips and Techniques for Engaging and Effective Learning
P. 314
lucas chap 08 11/20/02 12:51 PM Page 303
Making Your Visual Message Sizzle 303
of an arrow or finger, or create your own out of construction or other heavy paper (see
Tools for Trainers in the appendices for a template that can be copied and cut out). An-
other creative alternative is to collect the little plastic indicators that you see in some
steak houses (the ones that say rare, medium, or well done) or the swizzle sticks from
drinks in bars, restaurants, and on airplanes. You can also go to an arts and crafts store
to buy plastic cake decorations in various shapes, or you might even use the plastic card
holder that comes in flower bouquets and normally have a point at the bottom end.
Think outside the box and you will find pointers everywhere! If you want to buy a plas-
tic finger pointer, you can also do that (see Resources for Trainers in the appendices).
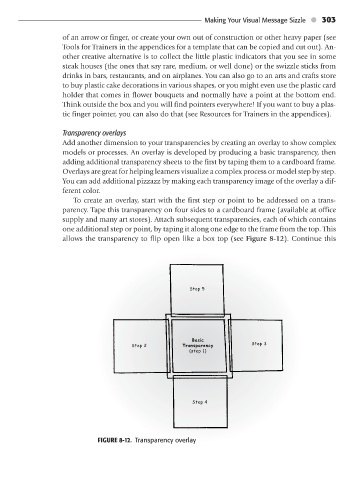
Transparency overlays
Add another dimension to your transparencies by creating an overlay to show complex
models or processes. An overlay is developed by producing a basic transparency, then
adding additional transparency sheets to the first by taping them to a cardboard frame.
Overlays are great for helping learners visualize a complex process or model step by step.
You can add additional pizzazz by making each transparency image of the overlay a dif-
ferent color.
To create an overlay, start with the first step or point to be addressed on a trans-
parency. Tape this transparency on four sides to a cardboard frame (available at office
supply and many art stores). Attach subsequent transparencies, each of which contains
one additional step or point, by taping it along one edge to the frame from the top. This
allows the transparency to flip open like a box top (see Figure 8-12). Continue this
Step 5
Basic
Step 2 Transparency Step 3
(step 1)
Step 4
FIGURE 8-12. Transparency overlay