
Page 602 - 02. Subyek Computer Aided Design - Beginner’s Guide to SOLIDWORKS 2019- Level 1 by Alejandro Reyes
P. 602
Beginner's Guide to SOLIDWORKS 2019- Level I
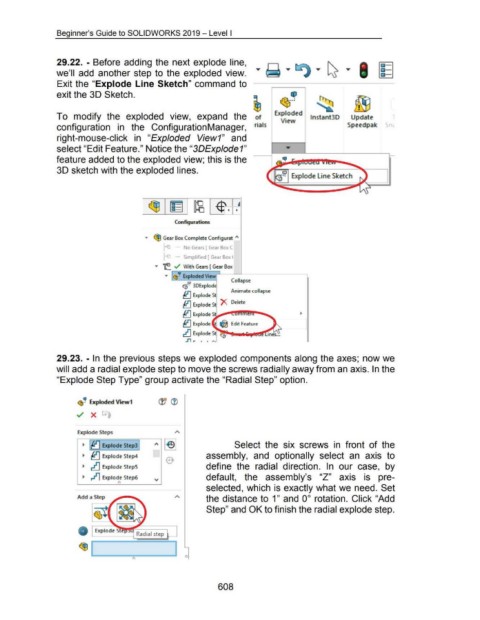
29.22. - Before adding the next explode line, ... ... ~ ... ~ ...
11
we'll add another step to the exploded view. ~ · -1 ~
Exit the "Explode Line Sketch" command to
exit the 30 Sketch. «J
~ ~--; ~
To modify the exploded view, expand the of Exploded lnstant3D Update 1
View Speedpak s (
configuration in the ConfigurationManager, ·ria Is
right-mouse-click in "Exploded View1" and
select "Edit Feature." Notice the "3D Explode 1"
feature added to the exploded view; this is the
30 sketch with the exploded lines.
Confagurations
... ~ Gear Box Complete Configurat I\
r-' No Gears [ Gear Bo~ C
n - - Simplified [ Gear Box <
... 't: . .../ With Gears [ Gear Box
... I<!~ Exploded View L
Ill 1 Collapse
~-· 3DExplode
t.n Animate collapse
~ExplodeS
{tJ Explode S X Delete
{tJ ExplodeS ~
{tJ Explode I ~ Edit Feature ~
~ Explode S
II r 1 1 r ,
29.23. - In the previous steps we exploded components along the axes; now we
will add a radial explode step to move the screws radially away from an axis. In the
"Explode Step Type" group activate the "Radial Step" option.
~'!? Exploded View1 (JJ ®
../ X
Explode Steps
~ ~~ Explode Step31 Select the six screws in front of the
~ ~ Explode Step4 assembly, and optionally select an axis to
~ ~ Explode StepS define the radial direction. In our case, by
~ ,.11 Explode Step6 default, the assembly's "Z" axis is pre-
selected, which is exactly what we need. Set
Add a Step the distance to 1" and oo rotation. Click "Add
~ Step" and OK to finish the radial explode step.
(@
~ [ J
0
608