
Page 72 - Build Your Own Quadcopter_ Power Up Your Designs with the Parallax Elev-8
P. 72
Chapter 3: Building the Ele v-8 51
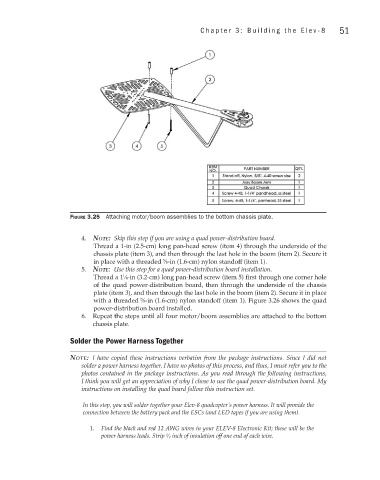
Figure 3.25 Attaching motor/boom assemblies to the bottom chassis plate.
4. note: Skip this step if you are using a quad power-distribution board.
Thread a 1-in (2.5-cm) long pan-head screw (item 4) through the underside of the
chassis plate (item 3), and then through the last hole in the boom (item 2). Secure it
in place with a threaded ∕8-in (1.6-cm) nylon standoff (item 1).
5
5. note: Use this step for a quad power-distribution board installation.
1
Thread a 1 ∕4-in (3.2-cm) long pan-head screw (item 5) first through one corner hole
of the quad power-distribution board, then through the underside of the chassis
plate (item 3), and then through the last hole in the boom (item 2). Secure it in place
with a threaded ∕8-in (1.6-cm) nylon standoff (item 1). Figure 3.26 shows the quad
5
power-distribution board installed.
6. Repeat the steps until all four motor/boom assemblies are attached to the bottom
chassis plate.
Solder the Power Harness Together
note: I have copied these instructions verbatim from the package instructions. Since I did not
solder a power harness together, I have no photos of this process, and thus, I must refer you to the
photos contained in the package instructions. As you read through the following instructions,
I think you will get an appreciation of why I chose to use the quad power-distribution board. My
instructions on installing the quad board follow this instruction set.
In this step, you will solder together your Elev-8 quadcopter’s power harness. It will provide the
connection between the battery pack and the ESCs (and LED tapes if you are using them).
1. Find the black and red 12 AWG wires in your ELEV-8 Electronic Kit; these will be the
1
power harness leads. Strip ∕ 4 inch of insulation off one end of each wire.