
Page 120 - Enhancing CAD Drawings with Photoshop
P. 120
4386.book Page 103 Monday, November 15, 2004 3:27 PM
EXTRACTING ENTOURAGE 103
9. Pan the image down using the Hand tool. Continue tracing the well-defined edges using Smart
Highlighting. Stop when you reach her hair, as the hair presents a wispy edge that should not
be traced with Smart Highlighting.
10. Pan the image down by holding the spacebar until you can see the top of her head. Uncheck
Smart Highlighting in the Tool Options group. Click the Brush Size pop-up and change its
value to 30 pixels. You are enlarging the brush to cover more of the wispy edge.
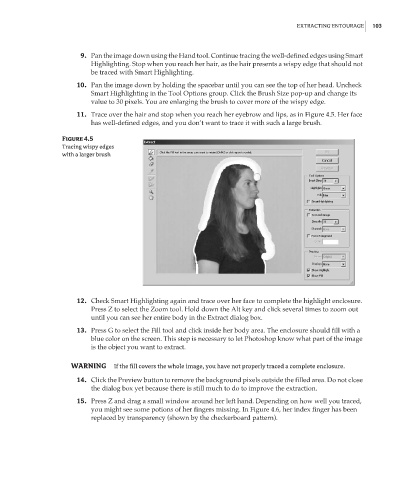
11. Trace over the hair and stop when you reach her eyebrow and lips, as in Figure 4.5. Her face
has well-defined edges, and you don’t want to trace it with such a large brush.
Figure 4.5
Tracing wispy edges
with a larger brush
12. Check Smart Highlighting again and trace over her face to complete the highlight enclosure.
Press Z to select the Zoom tool. Hold down the Alt key and click several times to zoom out
until you can see her entire body in the Extract dialog box.
13. Press G to select the Fill tool and click inside her body area. The enclosure should fill with a
blue color on the screen. This step is necessary to let Photoshop know what part of the image
is the object you want to extract.
WARNING If the fill covers the whole image, you have not properly traced a complete enclosure.
14. Click the Preview button to remove the background pixels outside the filled area. Do not close
the dialog box yet because there is still much to do to improve the extraction.
15. Press Z and drag a small window around her left hand. Depending on how well you traced,
you might see some potions of her fingers missing. In Figure 4.6, her index finger has been
replaced by transparency (shown by the checkerboard pattern).