
Page 188 - Enhancing CAD Drawings with Photoshop
P. 188
4386.book Page 172 Monday, November 15, 2004 3:27 PM
172 CHAPTER 5 PRESENTING PLANS
2. Select the Kitchen-A-mlwk-lowr layer. Select the Line tool in the toolbox; on the Options bar,
select Fill Pixels mode, set Width to 1 pixel, and uncheck Anti-aliased. Hold down the Shift key
and draw a line at a 45° angle across the countertop as indicated in Figure 5.36.
3. Click the Mahogany Vertical Grain layer, and use the Paint Bucket to fill in black in the area
surrounding the sink. The pattern appears immediately because any black pixels on this layer
have the Pattern Overlay effect already applied.
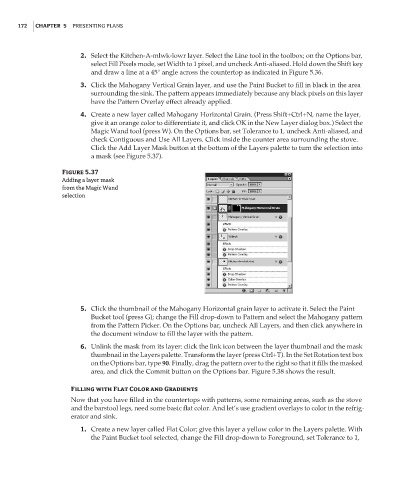
4. Create a new layer called Mahogany Horizontal Grain. (Press Shift+Ctrl+N, name the layer,
give it an orange color to differentiate it, and click OK in the New Layer dialog box.) Select the
Magic Wand tool (press W). On the Options bar, set Tolerance to 1, uncheck Anti-aliased, and
check Contiguous and Use All Layers. Click inside the counter area surrounding the stove.
Click the Add Layer Mask button at the bottom of the Layers palette to turn the selection into
a mask (see Figure 5.37).
Figure 5.37
Adding a layer mask
from the Magic Wand
selection
5. Click the thumbnail of the Mahogany Horizontal grain layer to activate it. Select the Paint
Bucket tool (press G); change the Fill drop-down to Pattern and select the Mahogany pattern
from the Pattern Picker. On the Options bar, uncheck All Layers, and then click anywhere in
the document window to fill the layer with the pattern.
6. Unlink the mask from its layer: click the link icon between the layer thumbnail and the mask
thumbnail in the Layers palette. Transform the layer (press Ctrl+T). In the Set Rotation text box
on the Options bar, type 90. Finally, drag the pattern over to the right so that it fills the masked
area, and click the Commit button on the Options bar. Figure 5.38 shows the result.
Filling with Flat Color and Gradients
Now that you have filled in the countertops with patterns, some remaining areas, such as the stove
and the barstool legs, need some basic flat color. And let’s use gradient overlays to color in the refrig-
erator and sink.
1. Create a new layer called Flat Color; give this layer a yellow color in the Layers palette. With
the Paint Bucket tool selected, change the Fill drop-down to Foreground, set Tolerance to 1,