
Page 193 - Enhancing CAD Drawings with Photoshop
P. 193
4386.book Page 177 Monday, November 15, 2004 3:27 PM
LAYER STYLE TECHNIQUES 177
Aligning Patterns
We need to add a transition line where floor materials meet. This transition was not shown in the CAD
drawing, but it’s easy enough to add a straight line in Photoshop and then apply two floor materials:
1. Select the Kitchen-A-wall layer in the Layers palette. Select the Line tool in the toolbox; on the
Options bar, set Fill Pixels mode, set Width to 1 pixel, and uncheck Anti-alias. Hold down the
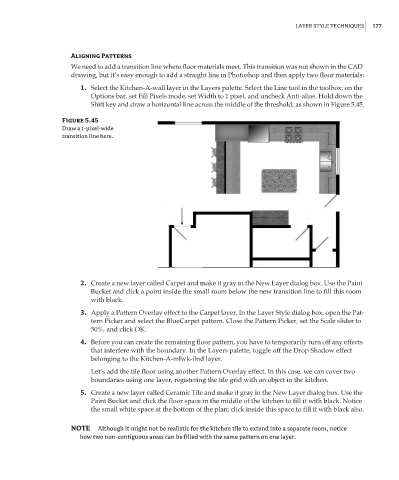
Shift key and draw a horizontal line across the middle of the threshold, as shown in Figure 5.45.
Figure 5.45
Draw a 1-pixel-wide
transition line here.
2. Create a new layer called Carpet and make it gray in the New Layer dialog box. Use the Paint
Bucket and click a point inside the small room below the new transition line to fill this room
with black.
3. Apply a Pattern Overlay effect to the Carpet layer. In the Layer Style dialog box, open the Pat-
tern Picker and select the BlueCarpet pattern. Close the Pattern Picker, set the Scale slider to
50%, and click OK.
4. Before you can create the remaining floor pattern, you have to temporarily turn off any effects
that interfere with the boundary. In the Layers palette, toggle off the Drop Shadow effect
belonging to the Kitchen-A-mlwk-ilnd layer.
Let’s add the tile floor using another Pattern Overlay effect. In this case, we can cover two
boundaries using one layer, registering the tile grid with an object in the kitchen.
5. Create a new layer called Ceramic Tile and make it gray in the New Layer dialog box. Use the
Paint Bucket and click the floor space in the middle of the kitchen to fill it with black. Notice
the small white space at the bottom of the plan; click inside this space to fill it with black also.
NOTE Although it might not be realistic for the kitchen tile to extend into a separate room, notice
how two non-contiguous areas can be filled with the same pattern on one layer.