
Page 194 - Enhancing CAD Drawings with Photoshop
P. 194
4386.book Page 178 Monday, November 15, 2004 3:27 PM
178 CHAPTER 5 PRESENTING PLANS
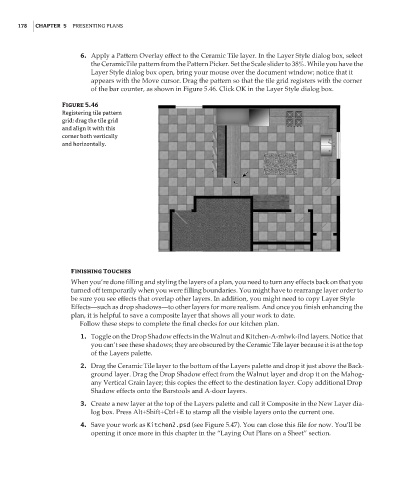
6. Apply a Pattern Overlay effect to the Ceramic Tile layer. In the Layer Style dialog box, select
the CeramicTile pattern from the Pattern Picker. Set the Scale slider to 38%. While you have the
Layer Style dialog box open, bring your mouse over the document window; notice that it
appears with the Move cursor. Drag the pattern so that the tile grid registers with the corner
of the bar counter, as shown in Figure 5.46. Click OK in the Layer Style dialog box.
Figure 5.46
Registering tile pattern
grid: drag the tile grid
and align it with this
corner both vertically
and horizontally.
Finishing Touches
When you’re done filling and styling the layers of a plan, you need to turn any effects back on that you
turned off temporarily when you were filling boundaries. You might have to rearrange layer order to
be sure you see effects that overlap other layers. In addition, you might need to copy Layer Style
Effects—such as drop shadows—to other layers for more realism. And once you finish enhancing the
plan, it is helpful to save a composite layer that shows all your work to date.
Follow these steps to complete the final checks for our kitchen plan.
1. Toggle on the Drop Shadow effects in the Walnut and Kitchen-A-mlwk-ilnd layers. Notice that
you can’t see these shadows; they are obscured by the Ceramic Tile layer because it is at the top
of the Layers palette.
2. Drag the Ceramic Tile layer to the bottom of the Layers palette and drop it just above the Back-
ground layer. Drag the Drop Shadow effect from the Walnut layer and drop it on the Mahog-
any Vertical Grain layer; this copies the effect to the destination layer. Copy additional Drop
Shadow effects onto the Barstools and A-door layers.
3. Create a new layer at the top of the Layers palette and call it Composite in the New Layer dia-
log box. Press Alt+Shift+Ctrl+E to stamp all the visible layers onto the current one.
4. Save your work as Kitchen2.psd (see Figure 5.47). You can close this file for now. You’ll be
opening it once more in this chapter in the “Laying Out Plans on a Sheet” section.