
Page 211 - Enhancing CAD Drawings with Photoshop
P. 211
4386.book Page 195 Monday, November 15, 2004 3:27 PM
CONVERTING AUTOCAD DRAWINGS 195
TIP The sample elevation CAD drawing has already been cleaned. See Chapter 5, “Presenting
Plans,” if you are referring to this tutorial but working on your own elevation drawing.
To convert this AutoCAD file to an image, you will use the printer driver, plot style table, and
custom paper size that were set up in Chapter 5. If you haven’t performed these steps, skip
ahead to step 5 and open an already-converted image from the CD.
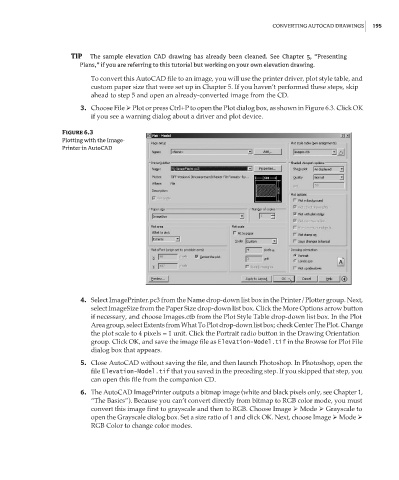
3. Choose File Plot or press Ctrl+P to open the Plot dialog box, as shown in Figure 6.3. Click OK
if you see a warning dialog about a driver and plot device.
Figure 6.3
Plotting with the Image-
Printer in AutoCAD
4. Select ImagePrinter.pc3 from the Name drop-down list box in the Printer/Plotter group. Next,
select ImageSize from the Paper Size drop-down list box. Click the More Options arrow button
if necessary, and choose Images.ctb from the Plot Style Table drop-down list box. In the Plot
Area group, select Extents from What To Plot drop-down list box; check Center The Plot. Change
the plot scale to 4 pixels = 1 unit. Click the Portrait radio button in the Drawing Orientation
group. Click OK, and save the image file as Elevation-Model.tif in the Browse for Plot File
dialog box that appears.
5. Close AutoCAD without saving the file, and then launch Photoshop. In Photoshop, open the
file Elevation-Model.tif that you saved in the preceding step. If you skipped that step, you
can open this file from the companion CD.
6. The AutoCAD ImagePrinter outputs a bitmap image (white and black pixels only, see Chapter 1,
“The Basics”). Because you can’t convert directly from bitmap to RGB color mode, you must
convert this image first to grayscale and then to RGB. Choose Image Mode Grayscale to
open the Grayscale dialog box. Set a size ratio of 1 and click OK. Next, choose Image Mode
RGB Color to change color modes.